4 - Build and Deploy Bolt Server
In this chapter we will show how to upload your game server executables and how to configure your build on the PlayFab Servers 2.0 service.
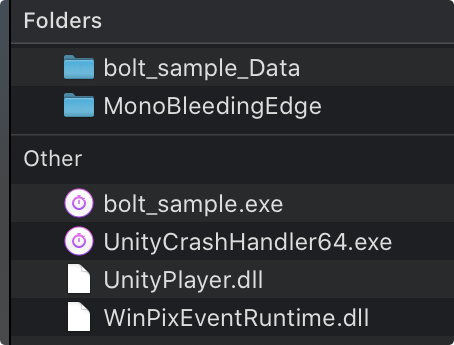
Now that we have our game binaries, the last step before going back to the PlayFab dashboard is to zip all the files into a single package, that we will name bolt_sample.zip as an example.
One important detail at this moment: zip your files with the game executable at the root level (don't include the binaries into sub-folders), this will facilitate the build configuration later on.
In the case of our example, the executable is named bolt_sample.exe, as shown below.

Creating a new Build on Thunderhead
In order to run a Game Servers, we need first a Build (in the terms of the PlayFab service) containing all the necessary configurations.
Thunderhead will use these settings to build containers, configure firewalls and distribute virtual machines into various regions, all set in one place.
Go back to PlayFab dashboard, click on the Multiplayer menu on the left, in the Build tab, select New Build.
You will find several fields to be filled in order to get the Build properly configured, so lets step by step:

You can also find a similar documentation on the official documentation page of PlayFab on this link.
Build Details - Information
In this section you will name your Build, select the Virtual Machine configuration you want to use and the number of Game Servers that can be executed per VM.
This is an important part, as you are choosing how much computing power your server needs to simulate your game properly, and this will vary from game to game.
PlayFab also gives you the ability to run several servers from the same machine, which has some implications in terms of network usage and of course, CPU consumption. You can read more about the VM types and prices here: https://docs.microsoft.com/en-us/gaming/playfab/features/multiplayer/servers/billing-for-thunderhead.
- Recommended options:
- Build Name:
Bolt Server Build; - Virtual Machine Selection:
Standard_A8_v2 (8 cores); - Servers per machine:
1.
- Build Name:
Build Details - Virtual Machine OS
PlayFab Thunderhead supports both Windows and Linux virtual machines, but the process of getting the Linux servers running involves building the Container Image by your self and uploading it directly to the server, on the other hand, Windows builds requires just that we upload our binaries, easier, but with less flexibility.
- Recommended options:
- Platform:
Windows; - Container image:
Windows Server Core.
- Platform:
Build Details - Assets
Here is the place where you will upload your game binaries.
Each file you include in this list will be embeded into the container image later in the build process, and expanded when the container is running.
This lets us to send any custom files necessary to our game run properly.
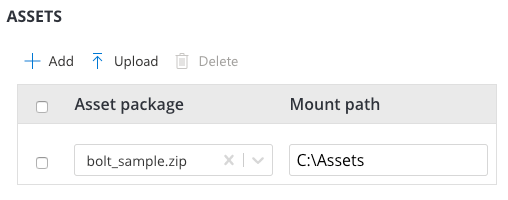
Click in the Upload button and select the zip you've packaged before:
- Recommended options:
- Asset package:
bolt_sample.zip; - Mount path:
C:\Assets.
- Asset package:

Build Details - Start Command
This field is simple, yet powerful, here you set which entrypoint command needs to be executed in order to get our executable running.
As we need to run the server in headless mode, we will make use of some Unity Command Line arguments (read more here) to signal to our game that it need to follow this mode.
In the input field, write this:
Plain Old Text
C:\Assets\bolt_sample.exe -batchmode -nographics
Let's break it in some parts:
C:\Assets: is the mounting path we've set on the previous field, and where our zip will be unzipped.bolt_sample.exe: the name of our game executable, as we set earlier.-batchmode -nographics: those are the necessary arguments to make the game run in headless mode, in other words, nothing will be displayed, neither inputs will be captured from the host.
Build Details - Network
Considering that the server needs to communicate with the external world, this section lets your configure all necessary ports that need to be open, applying the changes directly to the firewall settings of the container and virtual machines managed by PlayFab.
We need to open two sets of ports: (i) the main Bolt server port, from where all connection will be mediated - in this example we've selected the port 60001 arbitrary, and (i) Photon Cloud ports, necessary to make our server communicate with the Photon servers - here you can get a complete list of ports used by Photon, but we are only interested in the UDP ports.
Follow the table below to get your build with the right ports opened.
| Port | Name | Protocol |
|---|---|---|
| 60001 | bolt_server | UDP |
| 5055 | master_server1 | UDP |
| 27001 | master_server2 | UDP |
| 5056 | game_server1 | UDP |
| 27002 | game_server2 | UDP |
| 5058 | name_server1 | UDP |
| 27000 | name_server2 | UDP |
Build Details - Optionals
The Certificate and Metadata are optionais fields and will not be convered on this tutorial.
Regions
In the Regions field, you will define in which region your server will be deployed to wait for players. You can set any region you want, just make sure that you have set at least the value 1 to Standby servers and Maximum servers.
This will guarantee that we will have 1 Virtual Machine running 1 Game Server.
You will be able to change those values later.
- Recommended options:
- Region:
East US; - Standby servers:
1; - Maximum servers:
1.
- Region:
Build & Connect
Now that we have the Build settings properly set, just click on the Save button and go get some coffee, as the next step will take some time.
After you persist all configurations the PlayFab Orchestrator will enter in the scene and take care of the rest of the details:
- Provision an available
Hosting Machineon theAzureinfrastructure; - Create the necessary
Virtual Machines; - Configure and create the
Dockerimages using your settings; - Spawn containers running your
Game Server.
You can follow the status of this process directly from the main dashboard, in the Build tab, inside the Multiplayer menu.
You will probably see the status going from Deploying to Deployed.
If you see the green Deployed status, great, that means your server is deployed and running on PlayFab Thunderhead! Yay!
On the other tabs you can find more information about the Virtual Machine where the game is running, and the status of individual instances, if you choose to run more servers per VM.
It's also possible to have remote access to the Azure VM, this is really handy to perform some debugging.
At this moment, you should be ready to connect your Game Server.
Go back to the Unity project, and run the Game starting from the PlayFabHeadlessServer scene, it will instantaneity load the PlayFabClient menu, from where you can start as a client and join the session published by your Thunderhead server.