2 - Network Callbacks
Photon Bolt deals with replication in a completely different way compared to most if not all other networking solutions for Unity.
Instead of manually writing code for serializing data, for example using OnSerializeNetworkView in the built in Unity networking solution, Bolt lets you define transforms, animations and custom properties for it to automatically replicate over the network - you don't need to write any code whatsoever.
In fact in this entire tutorial we do not write any type of low level networking code, Bolt handles all of it for you.
Adding A Camera
The first thing we are going to do is set up a camera so that we can see what's going on, but instead of just dropping a camera into the scene we will go through Bolt and hook into some of it's callbacks.
The finished tutorial comes with an already functioning camera which has all the features we need and since this tutorial is not about building a third person camera, we are just going to use it verbatim.
You will find the camera prefab in Assets/samples/AdvancedTutorial/prefabs/singletons/resources/PlayerCamera and its associated script is available in Assets/samples/AdvancedTutorial/scripts/player/PlayerCamera.cs.
The camera script inherits from a utility base class defined inside bolt called BoltSingletonPrefab<T>, it is used to automatically load a prefab from a Resources.
Time to create our first script, start creating the folder Tutorial/Scripts/Callbacks, then a script called TutorialPlayerCallbacks.cs and follow the next steps:
- Have the class inherit from
Bolt.GlobalEventListener; - Apply the
[BoltGlobalBehaviour("Level2")]annotation to the class, selecting our target scene, Level2 in this case; - Override the
SceneLoadLocalDonemethod that is inherited fromBolt.GlobalEventListener, you can read more about this method on our API page; - Insert the
using Bolt.AdvancedTutorial;at the top of the file, in order to have access toPlayerCameraclass; - Inside the
SceneLoadLocalDone, callPlayerCamera.Instantiate()(yes, without any arguments); - It is very important that you DO NOT attach this behavior to any game object in any of your scenes.
C#
using Bolt.AdvancedTutorial;
using UnityEngine;

[BoltGlobalBehaviour("Level2")]
public class TutorialPlayerCallbacks : Bolt.GlobalEventListener
{
    public override void SceneLoadLocalDone(string map)
    {
        // this just instantiates our player camera,
        // the Instantiate() method is supplied by the BoltSingletonPrefab<T> class
        PlayerCamera.Instantiate();
    }
}
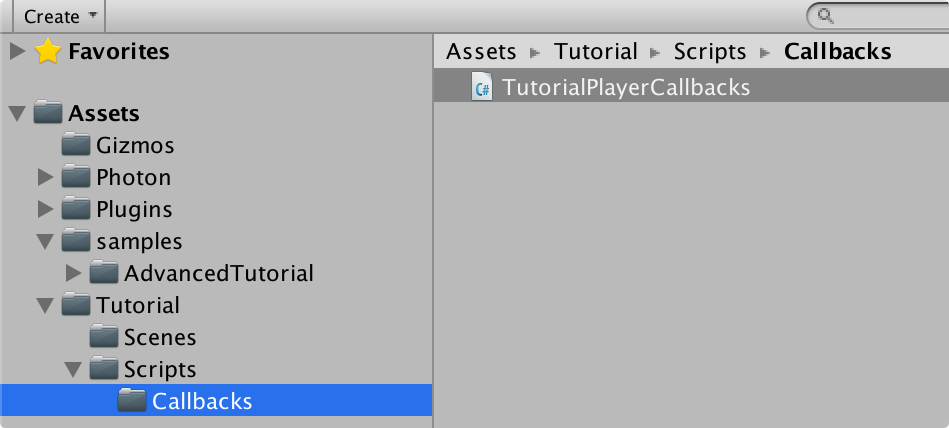
Before we start our game it is probably a good idea to explain exactly what is going on here.
What does the [BoltGlobalBehaviour] actually do? When Bolt starts, it will find all classes which have the [BoltGlobalBehaviour] and in some way or another inherit from MonoBehaviour (Since Bolt.GlobalEventListener itself inherits from MonoBehaviour our own class TutorialPlayerCallbacks is also considered as inheriting from MonoBehaviour).
Bolt will then go through the classes it found matching these two conditions and create instances of them automatically for you, so that they exist when Bolt is running and are destroyed when Bolt is shut down.
Any instances which are created will be added to the BoltBehaviours game object which is automatically created by Bolt on start and you can clearly see it in your scene hierarchy.
There are a couple of ways to configure how [BoltGlobalBehaviour] will act, the first and most simple one is that you can decide if the behaviour in question should run on either the host or client, or both.
Specifying nothing like we did for our TutorialPlayerCallbacks class means it will run on both the host and client.
C#
// only on the host
[BoltGlobalBehaviour(BoltNetworkModes.Server)]

// only on the client
[BoltGlobalBehaviour(BoltNetworkModes.Client)]
You can also tell Bolt that a behaviour should only be available during specific scenes, for example our scene is called Level2.
C#
// only when the current scene is 'Level2'
[BoltGlobalBehaviour("Level2")]

// only when the current scene is 'Level1', 'Level2' or 'Level3'
[BoltGlobalBehaviour("Level1", "Level2", "Level3")]
You can also combine these.
C#
// only when we are the host AND the current scene is 'Level2'
[BoltGlobalBehaviour(BoltNetworkModes.Server, "Level2")]

// only when we are the client AND the current scene is 'Level2'
[BoltGlobalBehaviour(BoltNetworkModes.Client, "Level2")]
This is an integral part of Bolt as it allows you to easily define behaviour that is global to the entire application or an entire scene, without having to manually fiddle around with passing a game object marked with DontDestroyOnLoad through all of your scenes.
Like we mentioned before it is paramount that you do not under any circumstance manually attach these scripts to an object in your scene, Bolt will handle this for you automatically.
Starting With Our Camera
Open the Bolt/Scenes window menu and click Play As Server on the Level2 scene.
You should now see the server starting in the Game window and our camera instantiate.
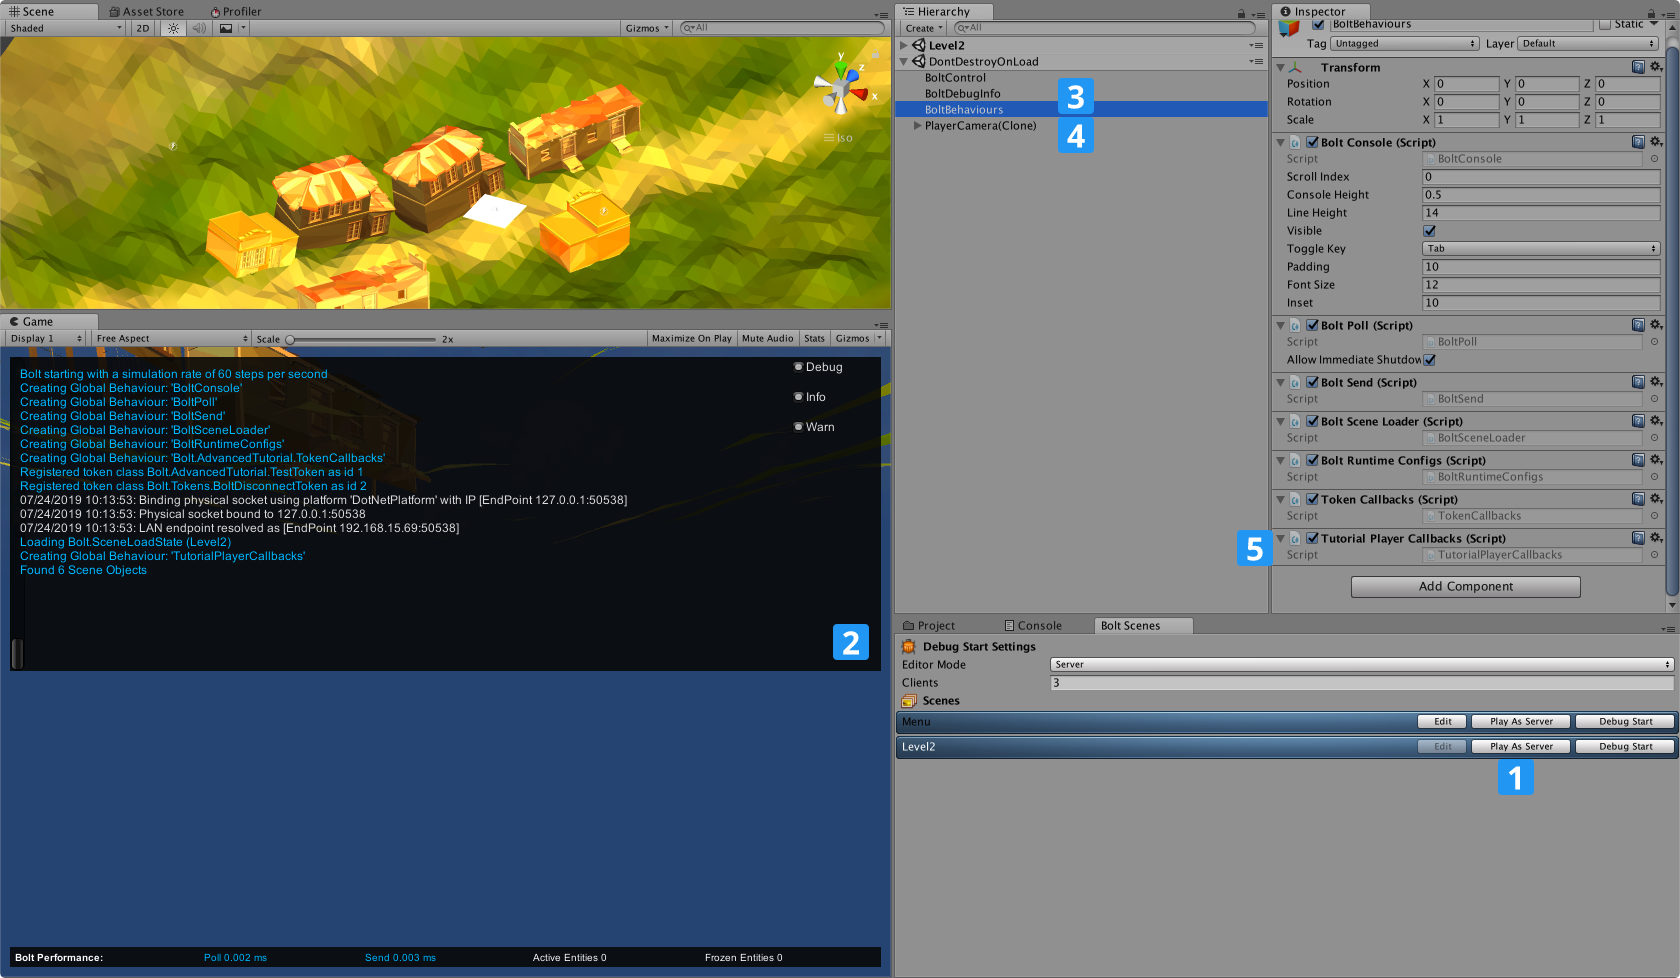
If you look in the scene hierarchy you will see a game object called BoltBehaviours, this is the Bolt internal object and we went the route of making it completely visible (no HideFlags) so that you know what's going on at all times.
If you check the inspector for this object you will see all of the internal behaviours that Bolt automatically instantiates and also your TutorialPlayerCallbacks behaviour at the bottom.
You will also see the PlayerCamera which was instantiated in the SceneLoadLocalDone callback.
Creating Our Prefab
In this section we will setup our player, this process can be repeated for any player you want to sync/control using Photon Bolt.
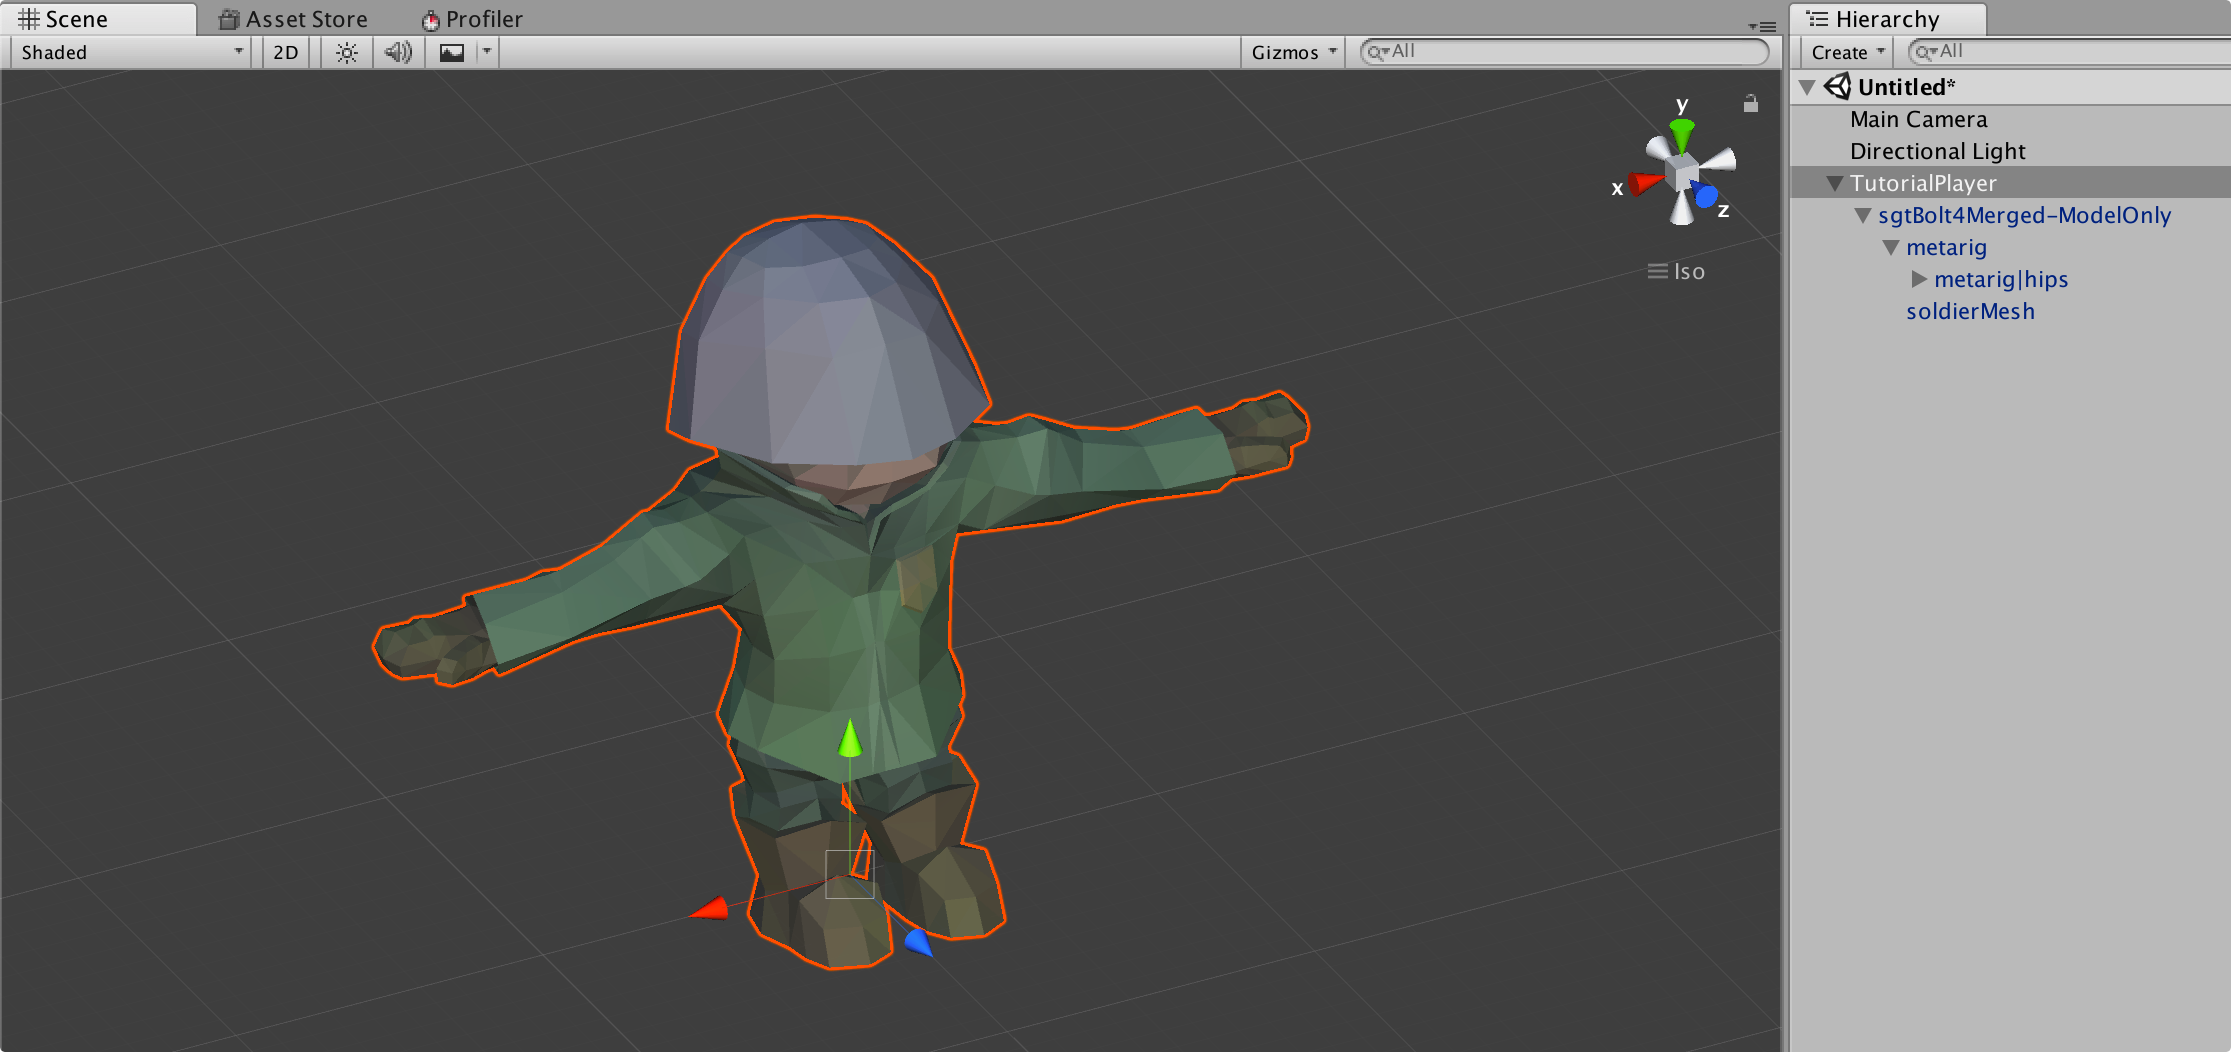
Start by creating a new empty game object in the scene and call it TutorialPlayer, make sure that it is positioned at (0, 0, 0) with rotation (0, 0, 0) and scale (1, 1, 1).
The model we are going to use can be found in Assets/samples/AdvancedTutorial/art/models/sgtBolt, the prefab called sgtBolt4Merged-ModelOnly, drag an instance of this prefab into the hierarchy.
Make sure the sgtBolt4Merged-ModelOnly object has the same position, rotation and scale values as the TutorialPlayer game object.
Now drag the sgtBolt4Merged-ModelOnly object as a child to your TutorialPlayer object, as show in the figure.
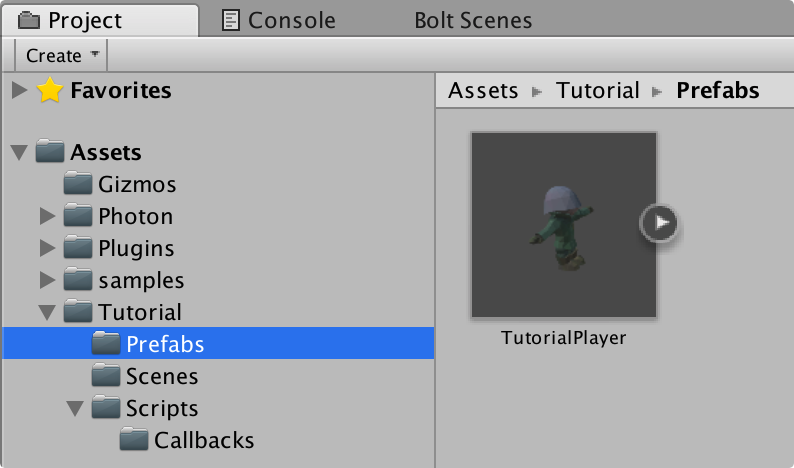
Create a new folder called Prefabs in your tutorial folder and drag your TutorialPlayer object into this folder to create a prefab out of it.
You can now delete the TutorialPlayer object in the scene hierarchy.
Select the TutorialPlayer prefab and add a Bolt Entity component to it.
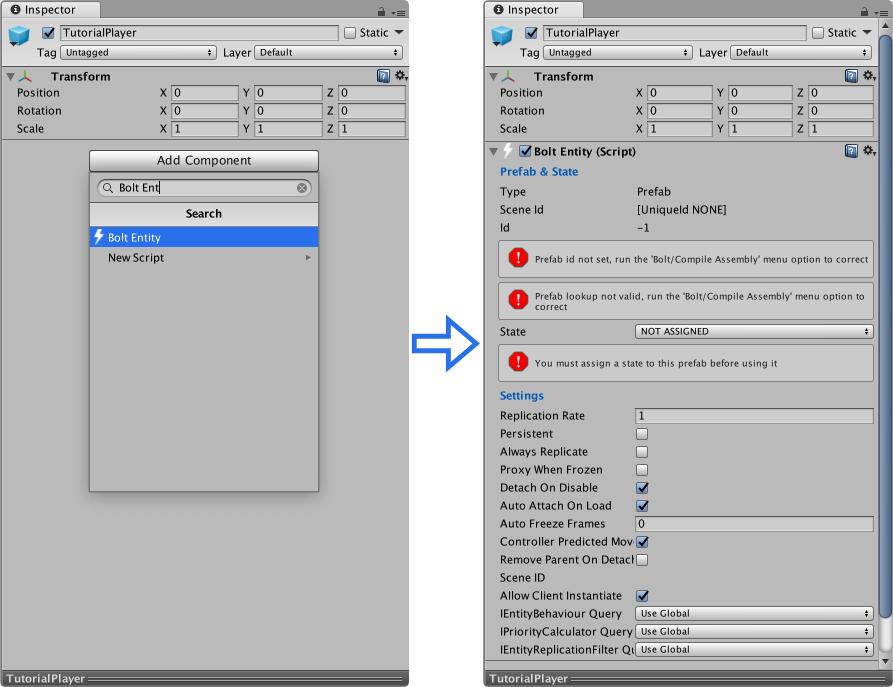
A Bolt Entity component is loosely related to a Network View in Unity or PUN, but it also serves a couple of additional purposes in Bolt.
The first thing we want to do is correct the two errors, this is simply done by going to the Bolt/Compile Assembly menu option at the top menu bar.
When compiling, Bolt will go through all of your prefabs and other Bolt-related assets and compile a very efficient network protocol for them, which is then stored inside of the bolt.user.dll assembly which you can find in Assets/Photon/PhotonBolt/assemblies folder.
Running the Bolt compilation is done for several things in Bolt, but we will cover all of them in this tutorial.
After you ran compile, the Bolt Entity component on your prefab should now look like this.
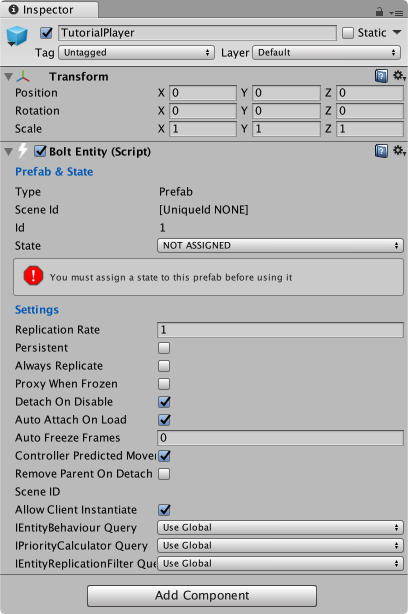
As you can see, the Bolt Entity is missing a state, this is covered next.
States In Bolt
Before we get into the details, let's define what "State" in Bolt actually is.
State is the transform, animation and data of your game object that you want to sync.
Bolt will automagically replicate any state that you assign to your entities over the network, including transform and animations (mecanim only, no legacy support).
Compared to most other networking solutions for Unity, Bolt takes a vastly different approach to sending data over the network.
Instead of manually writing serialize, deserialize and interpolation code, Bolt let you define data and interactions in a very convenient interface from inside the Unity Editor.
There are two editor windows available in Bolt which deals with the definition of networking assets, they are found under Bolt/Assets window.
If we open up the Bolt Assets window you will see a list of the existing assets that comes with the finished tutorial project.
We are going to start by creating our a state for our TutorialPlayer prefab, right-click anywhere in the Bolt Assets window and select New State.
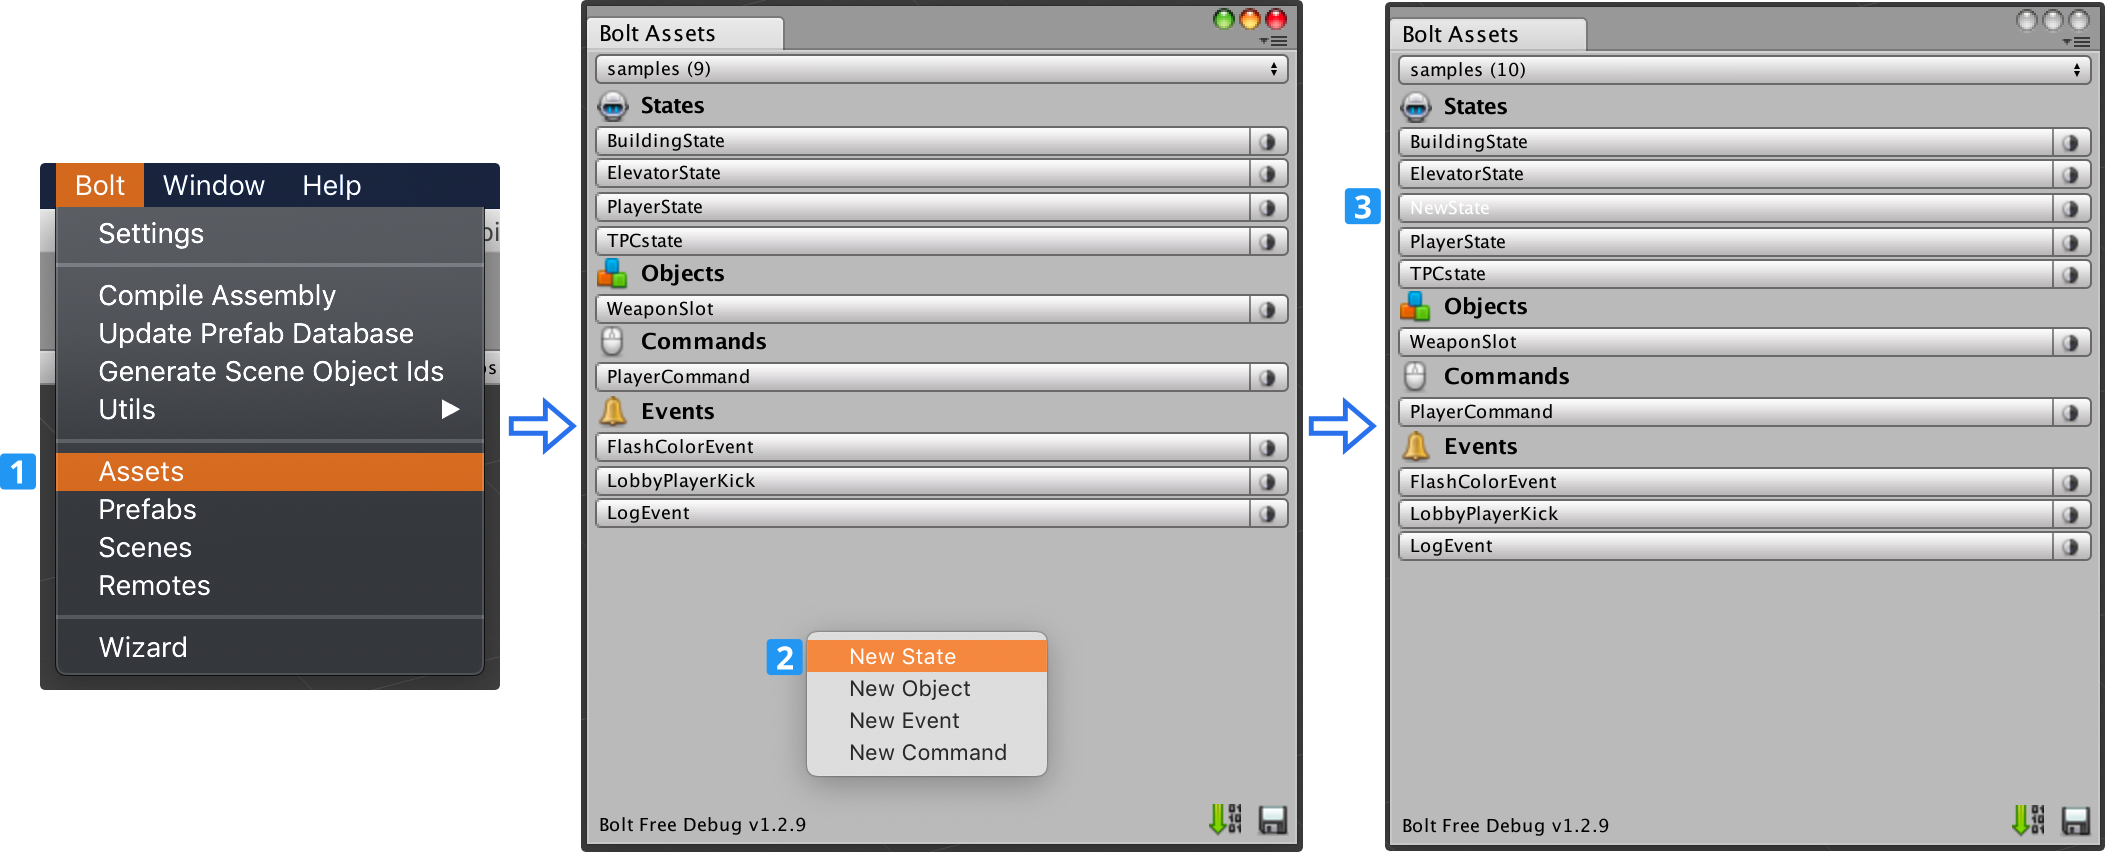
If Bolt did not automatically open it's editor window you can click on the newly created state NewState to open it.
Follow the next steps to setup this new state:
- Name the state TutorialPlayerState;
- Create a new Property;
- Rename it to Transform;
- Change its type to
Transform; - Change the
Replicationmode toEveryone Except Controller;
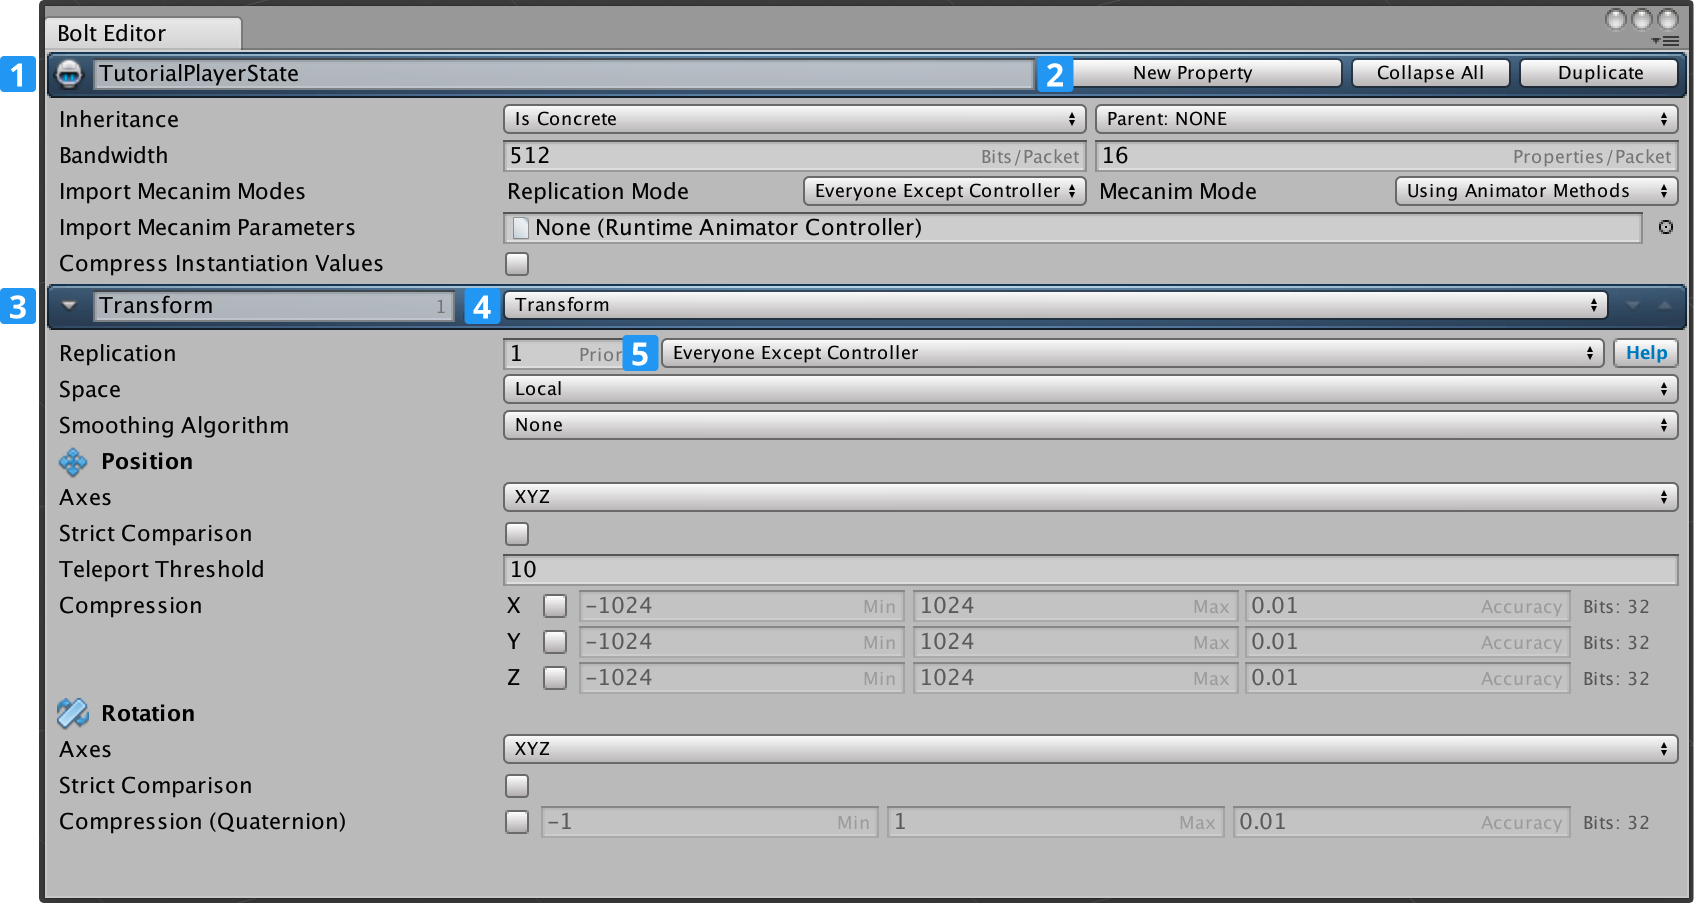
The other available settings on the Transform should be left at their defaults.
They allow configuration of more complex parts of Bolt such as prioritization of properties and smoothing algorithms.
As we've made changes to Bolt Assets, we need to run the compilation again at the Bolt/Compile Assembly menu.
Now select the TutorialPlayer prefab again and on it's Bolt Entity component under Prefab & State / State select the now available state called ITutorialPlayerState.
This is part of the code that Bolt produces after the compilation, a network ready interface for our internal replication implementation based on your State definition.
Don't forget to press the Apply button into your prefab to save the changes.
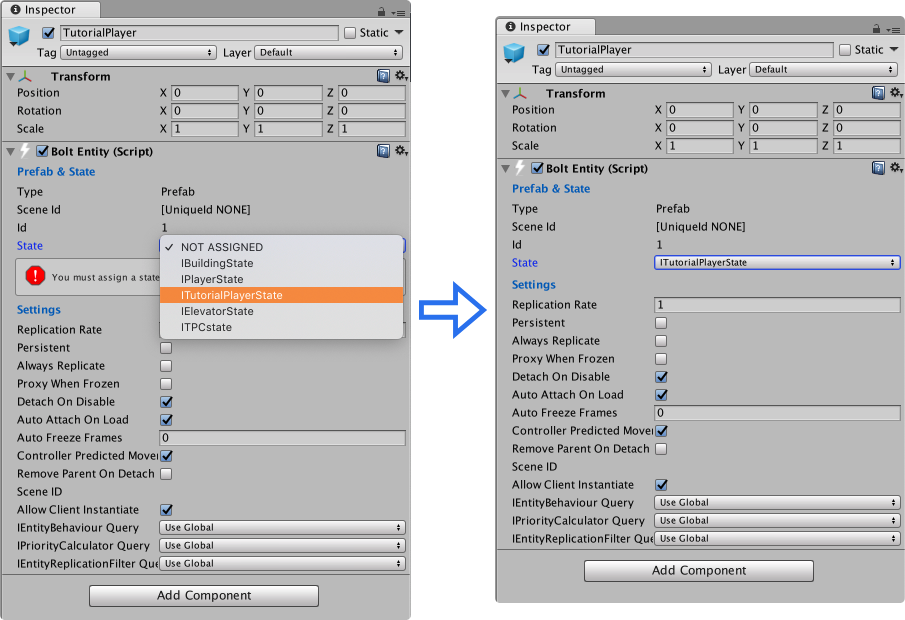
This all we need to do for now on the Prefab, later we will use this State via code in order to setup what is going to be networked.
Scene Loading Callbacks
We have one more thing to do before we can spawn a character for our game; we need to hook into a callback on the server to instantiate our prefab for both the server and clients.
Create a new script called TutorialServerCallbacks under the Tutorial/Scripts/Callbacks folder.
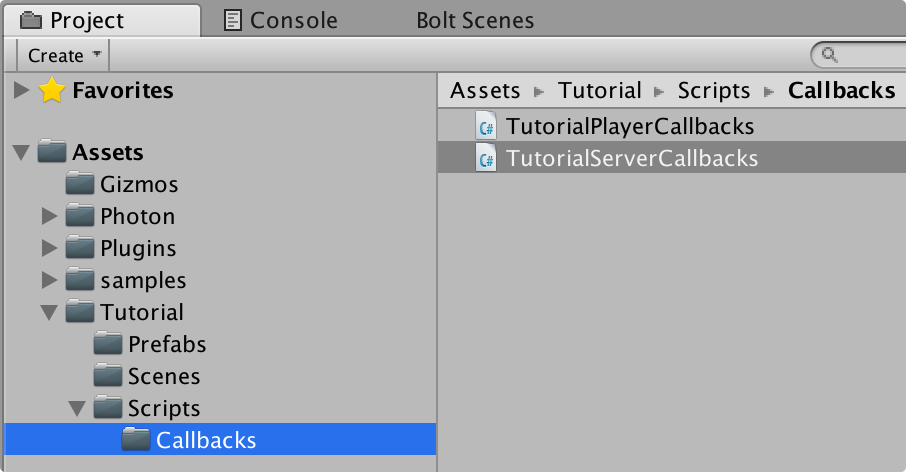
C#
using UnityEngine;

[BoltGlobalBehaviour(BoltNetworkModes.Server, "Level2")]
public class TutorialServerCallbacks : Bolt.GlobalEventListener
{
    public override void SceneLoadLocalDone(string map)
    {
        BoltNetwork.Instantiate(BoltPrefabs.TutorialPlayer);
    }

    public override void SceneLoadRemoteDone(BoltConnection connection)
    {
        BoltNetwork.Instantiate(BoltPrefabs.TutorialPlayer);
    }
}
The TutorialServerCallbacks class should inherit from Bolt.GlobalEventListener and should also be decorated with a BoltGlobalBehaviour which has the option for only running on the server (BoltNetworkModes.Server) and only on the Level2 scene.
We are also overriding two callbacks that have to do with scene loading:
SceneLoadLocalDone: will be invoked when the local computer is done loading the scene. Since this behaviour is marked as to only run on the server it will only be active on the server.SceneLoadRemoteDone: will be called when the remote end on the connection that is being passed in (BoltConnection connection) has loaded the scene. Bolt also only runs this behaviour on the server, this lets us tell when a client is done loading the current scene.
In both methods we simply instantiate a copy of our TutorialPlayer prefab.
Notice that the class BoltPrefabs contains a field for each of your Bolt entity prefabs, so you always have easy access to all of them (this is created during the compilation).
Start an instance of the server by pressing the Play As Server button in the Bolt Scenes window.
Not a lot will differ from the previous time we started our scene, but if you look in the hierarchy you will see an instance of our TutorialPlayer prefab.
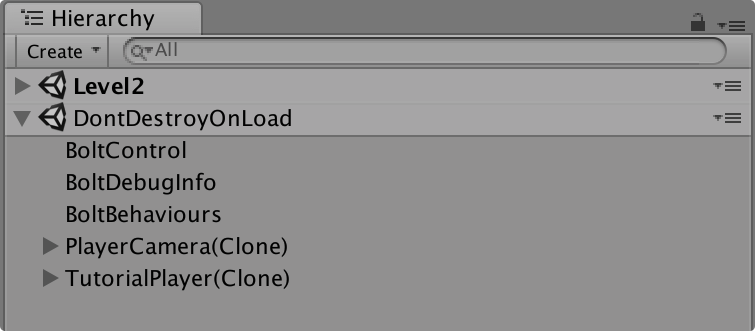
You can also build and launch a separate client which connects to the server; you will see that you get two TutorialPlayer prefab instances in the hierarchy.
Back to top