4 - Player Entity
Overview
In this part a player entity is created. It also provides instructions for writing gameplay code in Quantum.
Creating the Spaceship
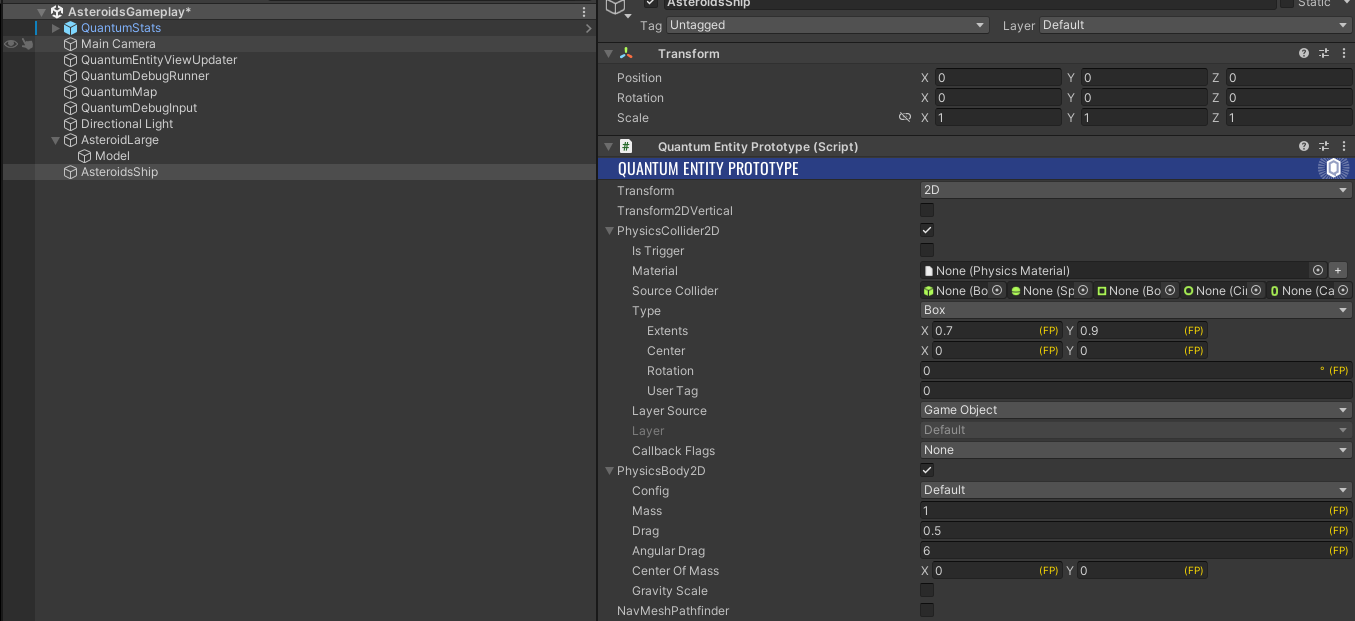
Create a new entity in the scene (Quantum > 2D > Quad Entity). Name it AsteroidsShip and remove the Mesh Filter and Mesh Renderer component from it.
Adjust the extends of the box collider to (0.7 0.9). Check the PhysicsBody2D box and adjust the Angular Drag to 6.
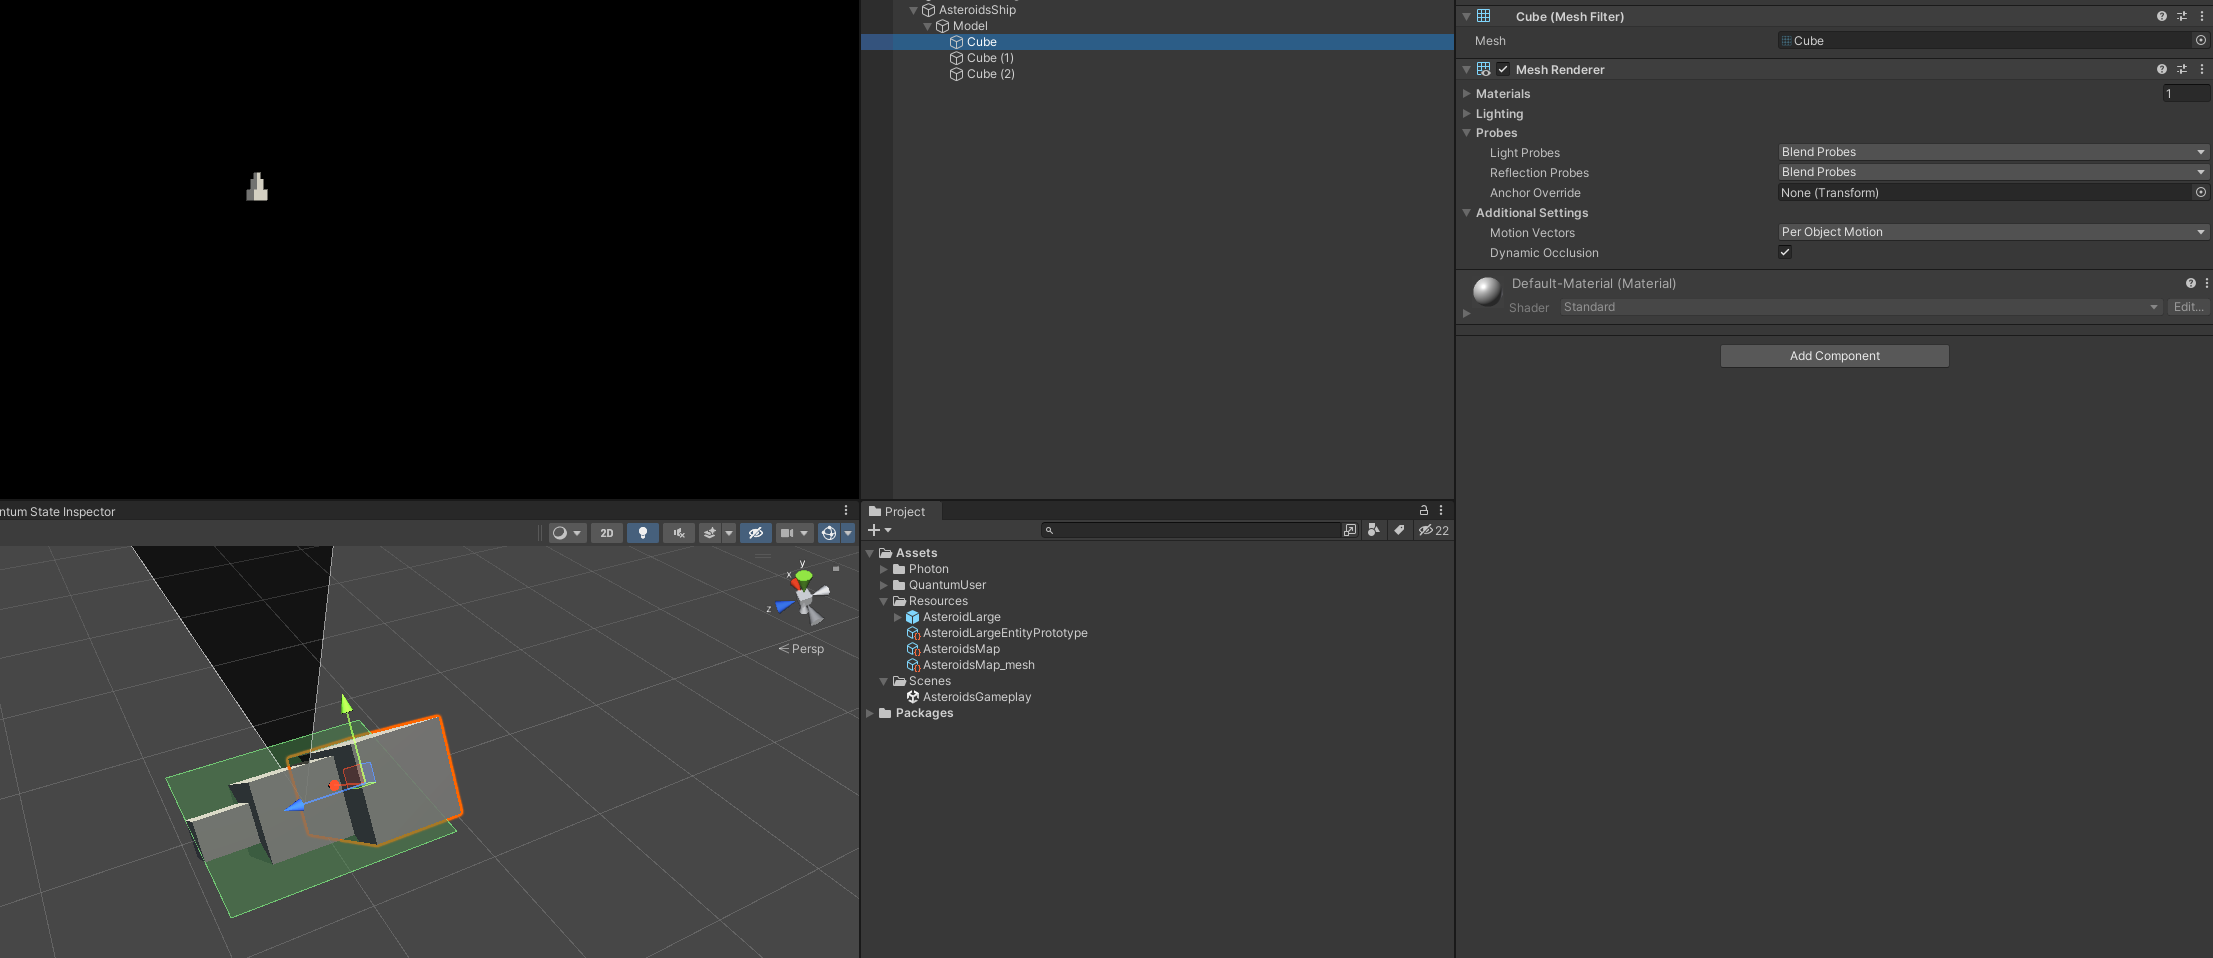
Next create the model for the ship. Create an empty child object and name it Model. Create 3 child cube GameObjects to the Model. Remove the box collider from each and set the rotation of each cube to (0, 0, -45).
- Set the first cube's position to
(0, 0, -0.542)and its scale to(1.2, 0.7, 0.7). - Set the second cube's position to
(0, 0, 0.07)and its scale to(0.6, 0.6, 0.8). - Set the third cube's position to
(0, 0, 0.649)and its scale to(0.3, 0.3, 0.5).
Gameplay Code
Navigate to Assets/QuantumUser/Simulation in the Project window. This is the location for all gameplay code.
Right-click on the Simulation folder. Choose Create > C# Script and name it AsteroidsShipSystem.cs.
Double-click the AsteroidsShipSystem.cs to open it in your IDE.
Once the file is open remove all code and replace it with:
C#
using UnityEngine.Scripting;

namespace Quantum.Asteroids
{
    [Preserve]
    public unsafe class AsteroidsShipSystem
    {
    }
}
The namespace is optional, and another name can be used. When not using the Quantum namespace add using Quantum; to the top.
The unsafe keyword allows for use of unsafe code such as pointers in the system.
The Preserve attribute needs to be added to all Quantum systems to ensure that Unity does include them in the build and ignore them when running code stripping.
The most common pattern in ECS to write gameplay code is to have a system iterate over a collection of entities which contain a set of components. With the Quantum ECS this can be achieved using a system main thread filter.
First add a filter struct to the AsteroidsShipSystem class:
C#
public struct Filter
{
    public EntityRef Entity;
    public Transform2D* Transform;
    public PhysicsBody2D* Body;
}
Each filter must always contain an EntityRef field and any number of component pointer fields to filter for. Always use pointers for the component types in the filter.
To add the filter have the system inherit from the SystemMainThreadFilter<AsteroidsShipSystem.Filter> class:
C#
[Preserve]
public unsafe class AsteroidsShipSystem : SystemMainThreadFilter<AsteroidsShipSystem.Filter>
Add an override of the abstract Update function with the following code:
C#
public override void Update(Frame f, ref Filter filter)
{
    // note: pointer property access via -> instead of .
    filter.Body->AddForce(filter.Transform->Up);
}
The update function runs once on each frame for each entity that has all the components in the filter. The frame parameter represents the current frame on which the system runs and gives access to the complete game state for that specific frame.
This code simply adds a constant force in the Up direction to the ship.
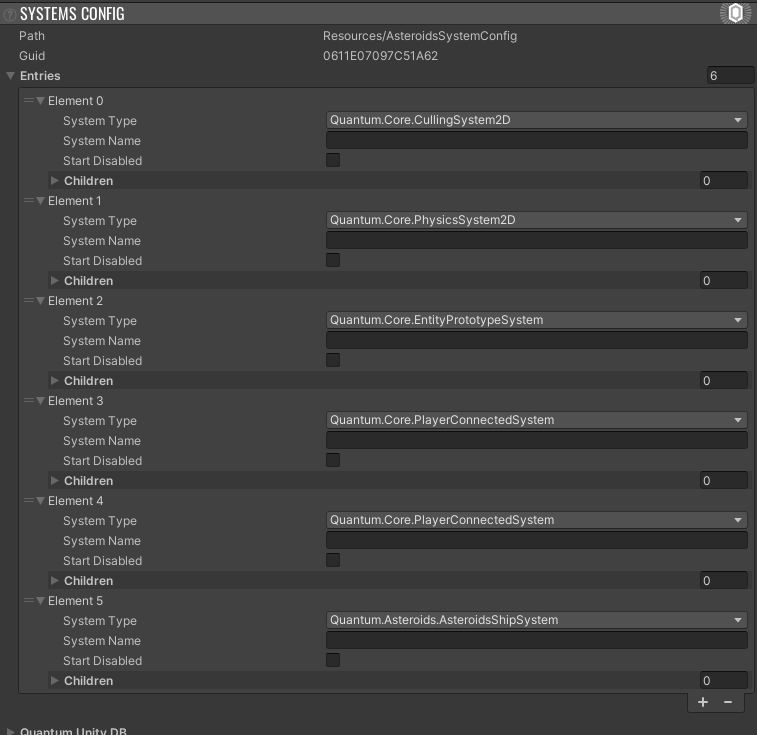
However, this code will not run yet. For a system to run it needs to be registered in the system config asset. Return to Unity and create a new system config asset (Right-click the Resources folder and chose Create > Quantum > Asset.. > SystemConfig). Name the asset AsteroidsSystemConfig.
The config already comes with a list of predefined systems in the Entries list. The systems in the SystemConfig are executed in the exact order in which they are listed in. Remove the 3D systems such as PhysicsSystem3D and CullingSystem3D. Also remove the Navigation system, this system is used for navmesh pathfinding which is not used for this game.
Add a new entry to the list. Select Quantum.Asteroids > AsteroidsShipSystem as the System Type.
Go to the QuantumDebugRunner object in the scene and drop the system config into the field under Runtime Config > Systems Config.
Disable Gravity
Enter play mode. Notice the ship is falling down instead of moving upwards. This is the case because gravity is still enabled.
There are two ways to disable gravity for a physics body.
- Set the
Gravity Scaleto 0 on theQuantumEntityPrototypein thePhysicsBody2D. - Disable gravity for the entire simulation.
In this case the later approach is used because there is no unidirectional gravity in the asteroids game.
Create a new SimulationConfig asset (Right-click Resources and chose Create > Quantum > Asset.. > SimulationConfig). Name it AsteroidsSimulationConfig. In the Physics tab set Gravity to (0, 0, 0).
The SimulationConfig asset contains a number of configurable settings for the Quantum simulation. In this tutorial the default values are sufficient. Drop the AsteroidsSimulationConfig into the Simulation Config field of the QuantumDebugRunner.
Enter play mode again. The ship is now correctly floating upwards slowly.
Input
Right-click the QuantumUser/Simulation folder. Choose Create > Quantum > Qtn. Name the file Input.
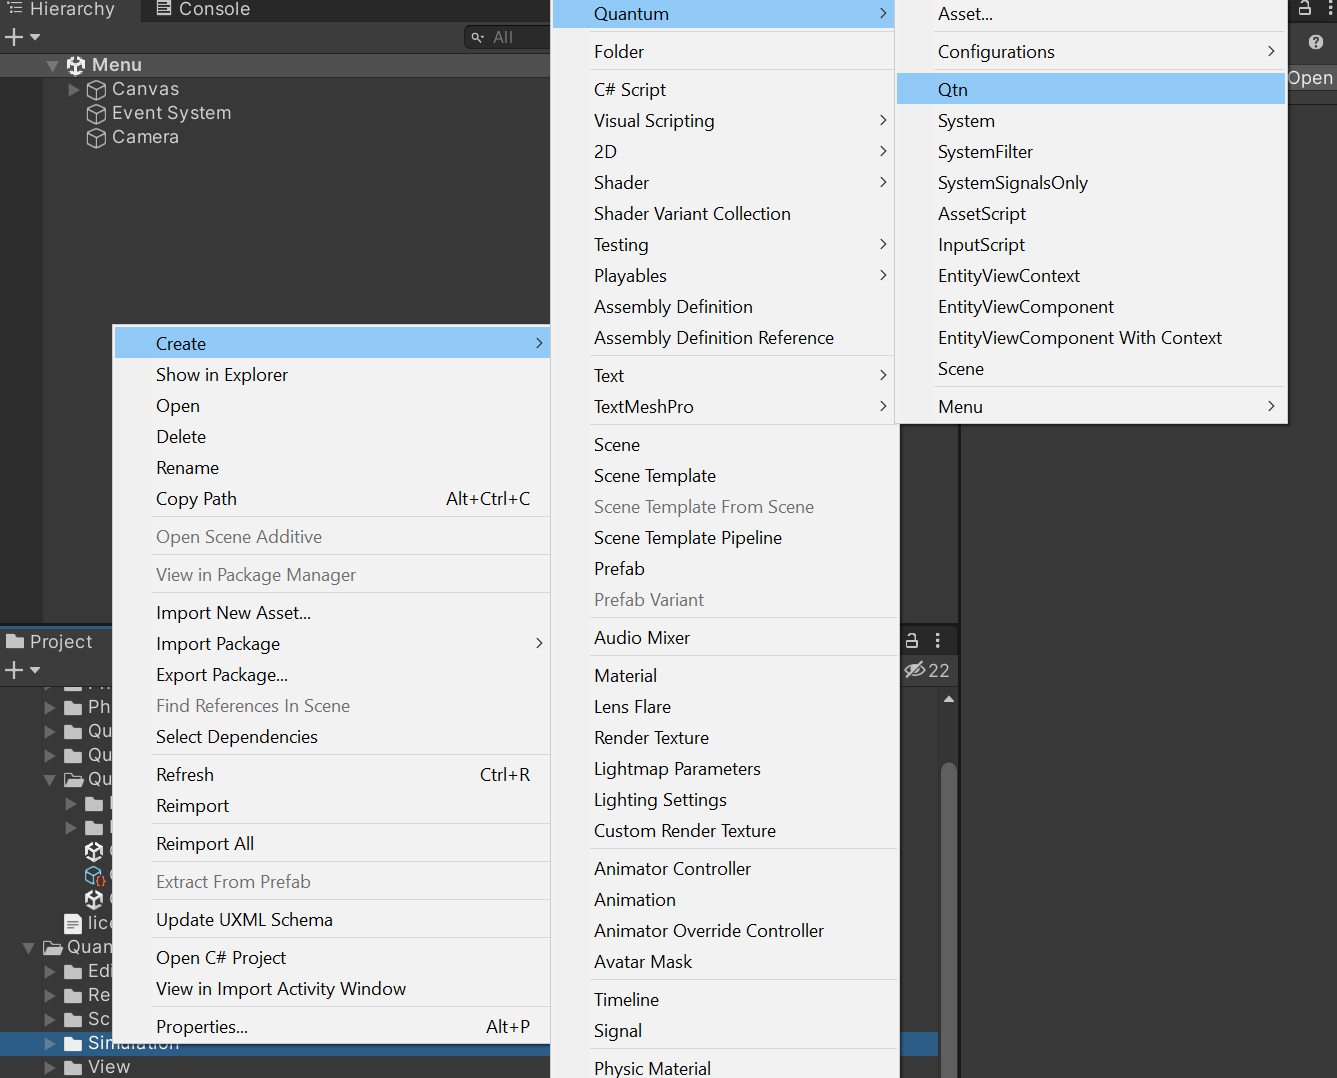
Qtn files are Quantum specific files using the Quantum Domain Specific Language (DSL). The syntax of the DSL is similar to C#. The DSL is used to define the entity component data and the input data. The gameplay systems are in C#.
Double-click the input file to open it in the IDE then add the following to it:
C#
input {
    button Left;
    button Right;
    button Up;
    button Fire;
}
The input is a special keyword in Quantum. Quantum only sends inputs, and not the game state, over the network. The Input defined here is the data that will be sent over the network and used by the gameplay simulation.
Note: Input is sent every tick and is used for inputs that change frequently and affect the real time gameplay. Examples are movement and button presses. For irregular rare inputs, use commands instead.
The jump button will be used to make the player jump. The button type is a Quantum specific type and should be used for all button inputs. Do not use booleans for button inputs. They consume more bandwidth. A button is coded into a single bit through the network.
Note: To add syntax highlighting support for DSL files to your IDE, follow the guide here.
Updating AsteroidsShipSystem
Return to Unity so that the project compiles. This runs the Quantum code generation that makes the Input from the .qtn file available in c# scripts.
Now that input is available open the AsteroidsShipSystem and add a new UpdateShipMovement function.
C#
private void UpdateShipMovement(Frame f, ref Filter filter, Input* input)
{
    FP shipAcceleration = 7;
    FP turnSpeed = 8;

    if (input->Up)
    {
        filter.Body->AddForce(filter.Transform->Up * shipAcceleration);
    }

    if (input->Left)
    {
        filter.Body->AddTorque(turnSpeed);
    }

    if (input->Right)
    {
        filter.Body->AddTorque(-turnSpeed);
    }

    filter.Body->AngularVelocity = FPMath.Clamp(filter.Body->AngularVelocity, -turnSpeed, turnSpeed);
}
The FP type is the Quantum equivalent to the c# float type. Quantum uses fixed point (FP) instead of floats to guarantee that the simulation is deterministic across devices.
Next, replace the code in the Update function with the following code.
C#
public override void Update(Frame f, ref Filter filter)
{
    // gets the input for player 0
    var input = f.GetPlayerInput(0);

    UpdateShipMovement(f, ref filter, input);
}
This function gets the input for player 0 in the game and moves the ship based on it. Later the hard coded 0 will be replaced so that each ship is moved by the player which corresponds to it.
Connecting Unity Inputs
Create a new AsteroidsInput script in the QuantumUser/View folder. The View folder is for code that runs on the Unity side of Quantum such as collecting input events from Unity and passing them into the Quantum simulation.
Open the script in the Unity project. This script is responsible for collecting Unity inputs and passing them into the Quantum engine. Replace the code in the script with the following:
C#
using Photon.Deterministic;
using UnityEngine;

namespace Quantum.Asteroids
{
    public class AsteroidsInput : MonoBehaviour
    {
        private void OnEnable()
        {
            QuantumCallback.Subscribe(this, (CallbackPollInput callback) => PollInput(callback));
        }

        public void PollInput(CallbackPollInput callback)
        {
            Quantum.Input i = new Quantum.Input();

            // Note: Use GetKey() instead of GetKeyDown/Up. Quantum calculates up/down internally.
            i.Left = UnityEngine.Input.GetKey(KeyCode.A) || UnityEngine.Input.GetKey(KeyCode.LeftArrow);
            i.Right = UnityEngine.Input.GetKey(KeyCode.D) || UnityEngine.Input.GetKey(KeyCode.RightArrow);
            i.Up = UnityEngine.Input.GetKey(KeyCode.W) || UnityEngine.Input.GetKey(KeyCode.UpArrow);
            i.Fire = UnityEngine.Input.GetKey(KeyCode.Space);

            callback.SetInput(i, DeterministicInputFlags.Repeatable);
        }
    }
}
Return to Unity and go the QuantumDebugInput object in the scene. Rename it to QuantumLocalInput, remove the QuantumDebugInput script and add the new AsteroidsInput script instead.
Next open the QuantumDebugRunner GameObject inspector. Under Local Players add an entry to represent a player. This will have Quantum collect input for the player 0. Currently, the 0 is hard coded into SystemSetup and the player is part of the scene. Later on this will be replaced with a dynamically spawned player entity for each player.
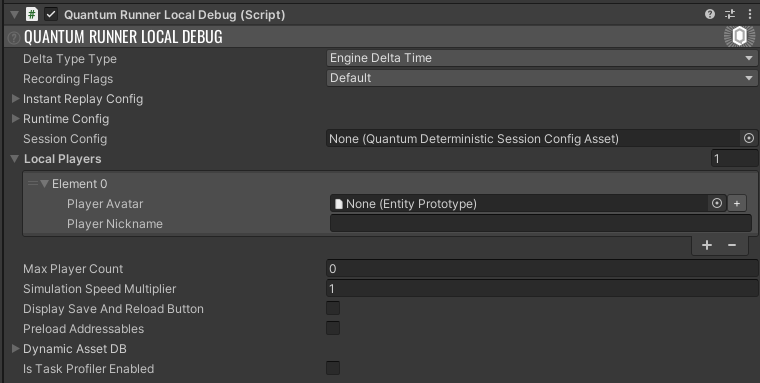
The player nickname and avatar can be used to pass more information about the player into the simulation.
Now when entering in play mode again the ship can move using the WASD keys.
