Collider and Body Components
Introduction
The collision and physics behaviour each have their own component in Quantum 2.
- Adding a PhysicsCollider2D/PhysicsCollider3D to an entity turns the entity into a dynamic obstacle or trigger which can be moved via its transform.
- Adding a PhysicsBody2D/PhysicsBody3D allows the entity to be controlled by the physics solver.
Requirements
The Transform2D/Transform3D, PhysicsCollider2D/PhysicsCollider3D and PhysicsBody2D/PhysicsBody3D components are tightly intertwined. As such some of them are requirements for others to function. The complete dependency list can be found below:
| Requirement | Transform | PhysicsCollider | PhysicsBody | |
|---|---|---|---|---|
| Component | ||||
| Transform | ✓ | ✗ | ✗ | |
| PhysicsCollider | ✓ | ✓ | ✗ | |
| PhysicsBody | ✓ | ✓ | ✓ |
These dependencies build on one another, thus it is necessary to add the components to an entity in the following order to enable a PhysicsBody:
- Transform
- PhysicsCollider
- PhysicsBody
Find here details on the collision callbacks.
The PhysicsBody Component
Adding the PhysicsBody ECS component to an entity enables this entity to be taken into account by the physics engine. N.B.: the use of a PhysicsBody requires the entity to already have a Transform and a PhysicsCollider .
It is possible to create and initialize the components either manually in code, or via the QuantumEntityPrototype component in Unity.
C#
    var entity = f.Create();
    var transform = new Transform2D();
    var collider = PhysicsCollider2D.Create(f, Shape2D.CreateCircle(1));
    var body = PhysicsBody2D.CreateDynamic(1);

    f.Set(entity, transform);
    f.Set(entity, collider);
    f.Set(entity, body);
The same rule applies to the 3D Physics:
C#
    var entity = f.Create();
    var transform = Transform3D.Create();

    var shape = Shape3D.CreateSphere(FP._1);

    var collider = PhysicsCollider3D.Create(shape);
    var body = PhysicsBody3D.CreateDynamic(FP._1);

    f.Set(entity, transform);
    f.Set(entity, collider);
    f.Set(entity, body);
In case of the QuantumEntityPrototype alternative, the components will be initialized with the values defined in the Unity inspector.
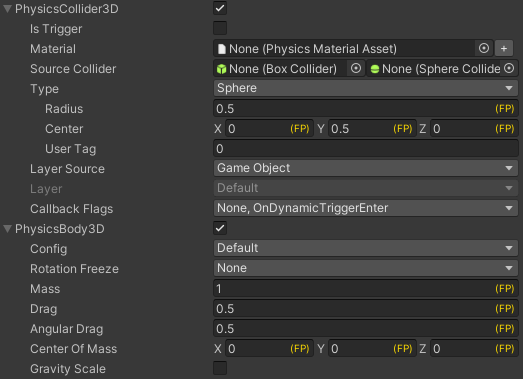
Supported shapes for dynamics
The PhysicsCollider3D only supports the following Shape3D for dynamic entities:
- Sphere
- Box
- Capsule
- Compound (a combination of multiple shapes)
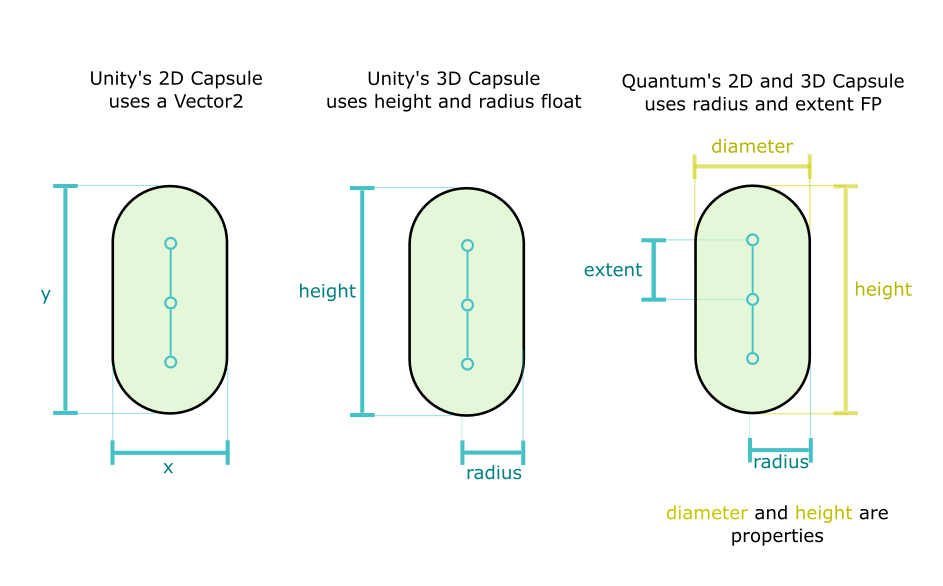
In the editor you can set the properties of the capsule shape using the same properties of the Unity's capsule: Radius and Height. But internally, Quantum's defines a capsule as Radius and Extent. Also, it has the height and diameter properties.
The PhysicsCollider2D only supports the following Shape2D for dynamic entities:
- Circle
- Box
- Polygon
- Edge
- Capsule
- Compound (a combination of multiple shapes)
Here are a couple code snippets related to capsule colliders that can be used:
C#
FP radius = FP._0_50;
FP extent = FP._1;
Shape2D shape = Shape2D.CreateCapsule(radius, extent);

// Draw the capsule
Draw.Capsule(FPVector2.Zero, shape.Capsule);
Draw.Capsule(FPVector2.Zero, extent, radius);
The picture below showcases the semantic differences between Quantum's and Unity's Capsule Colliders, for clarity sake.
Center of Mass
The Center of Mass, simply referred to as CoM from here on out, can be set on the PhysicsBody component. The CoM represents an offset relative to the position specified in the Transform component. Changing the position of the CoM allows to affect how forces are applied to the PhysicsBody.
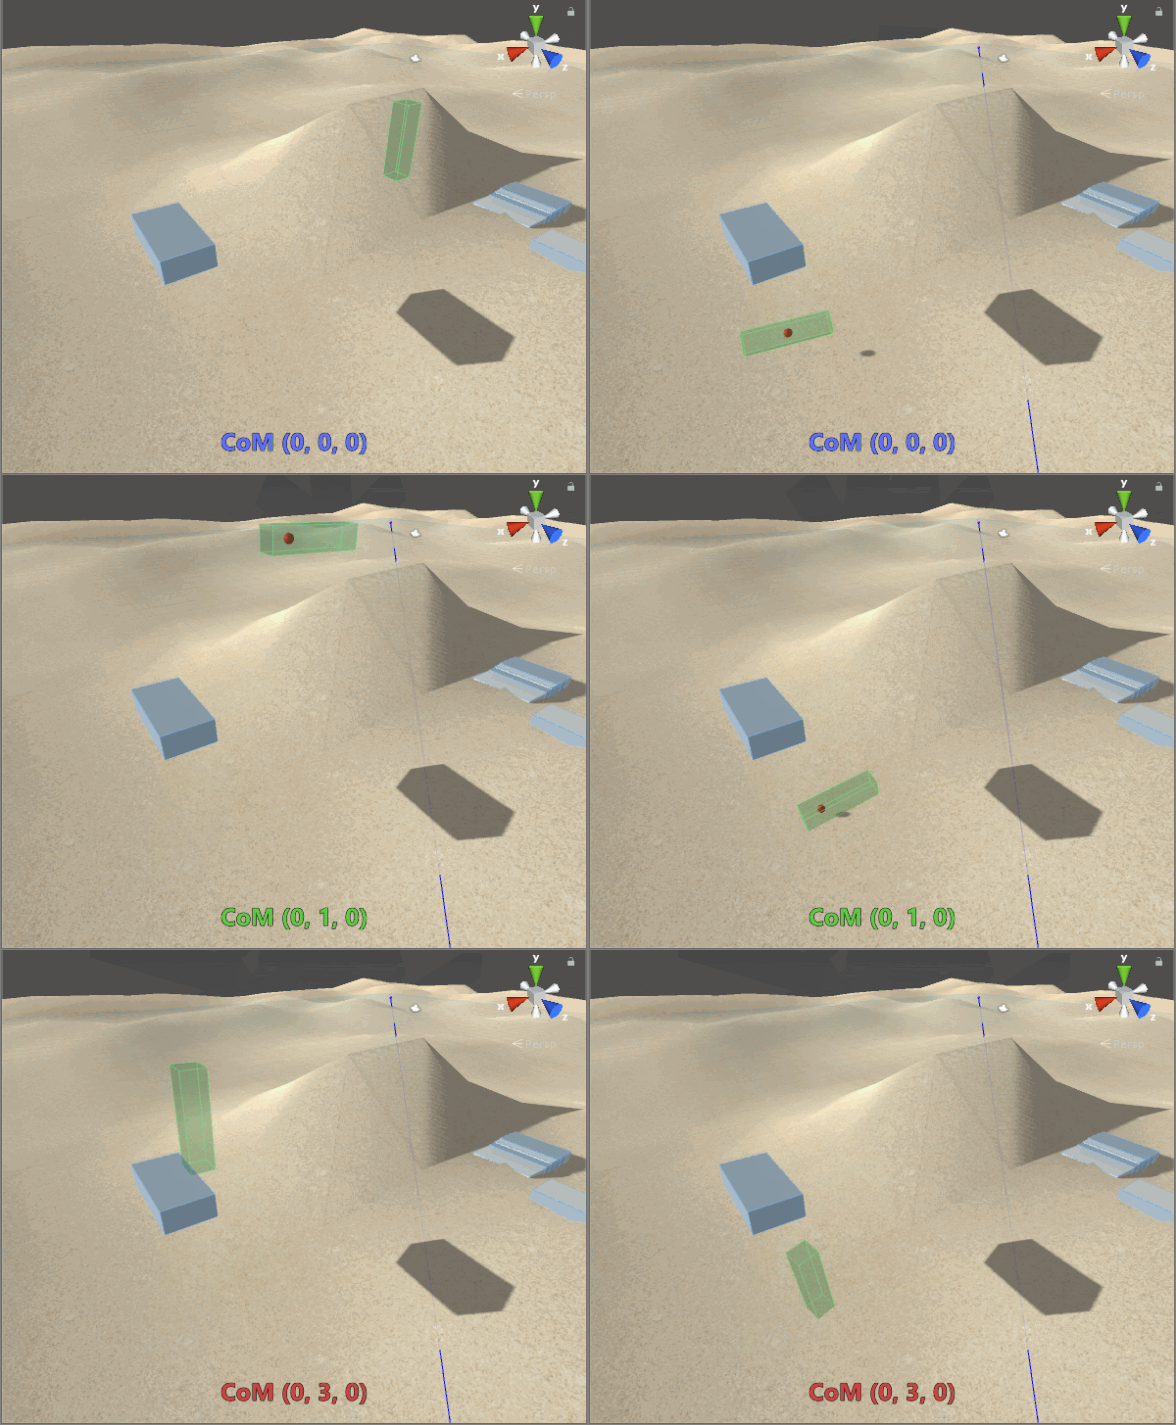
By default, the CoM is set to the centroid of the PhysicsCollider's shape. This is enforced by the Reset Center of Mass On Added in the PhysicsBody Config drawer.
N.B.: To customize the CoM position, it is NECESSARY to uncheck the Reset Center of Mass On Added flag; otherwise the CoM will be reset to the Collider's centroid when the PhysicsBody component gets added to the entity.
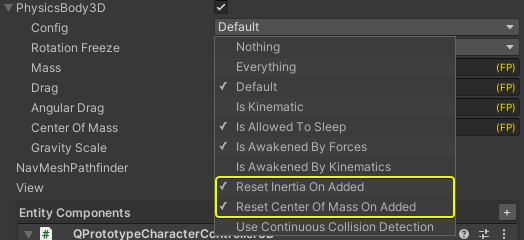
The above configuration is the commonly used for an entity behaving like a uniformly dense body, a.k.a. body with a uniform density. However, the CoM and collider offset are configured separately. The combinations are explained in the table below.
| PhysicsCollider Offset | PhysicsBody CoM | Reset Center of Mass On Added flag | Resulting positions |
|---|---|---|---|
| Default Position = 0, 0, 0 Custom Value = any position differing from the default position |
|||
| Default Position | Default Position | On / Off | Collider Centroid and the CoM positions are both equal to the transform position. |
| Custom Value | Default Position | On | Collider Centroid is offset from the transform, and the CoM is equal to the Collider Centroid position. |
| Custom Value | Default Position | Off | Collider Centroid is offset from the transform position. The CoM is equal to the transform position. |
| Custom Value | Custom Position | On | Collider Centroid is offset from the transform position. The CoM is equal to the Collider Centroid position. |
| Custom Value | Custom Position | Off | Collider Centroid is offset from the transform position. The CoM is offset from the transform position. |
Compound Collider CoM
A compound shape's CoM is a combination of all the shape's elements' centroids based on the weighted average of their areas (2D) or volumes (3D).
Key points
In summary, these are the main points to takeaway regarding the CoM configuration.
- The PhysicsCollider offset and PhysicsBody CoM positions are distinct from one another.
- By default the PhysicsBody Config has the flags
Reset Center of Mass On AddedandReset Inertia on Added. - To set a custom CoM, uncheck the
Reset Center of Mass On Addedflag in the PhysicsBody Config. - If the
Reset Center of Mass On Addedflag is checked on the PhysicsBody Config, the CoM will be automatically set to the PhysicsCollider centroid upon being added to the entity - regardless of the CoM position specified in the Editor.
Applying External Forces
The PhysicsBody API allows for the manual application of external forces to a body.
C#
// This is the 3D API, the 2D one is identical.

public void AddTorque(FPVector3 amount)
public void AddAngularImpulse(FPVector3 amount)

public void AddForce(FPVector3 amount, FPVector3? relativePoint = null)
public void AddLinearImpulse(FPVector3 amount, FPVector3? relativePoint = null)
// relativePoint is a vector from the body's center of mass to the point where the force is being applied, both in world space.
// If a relativePoint is provided, the resulting Torque is computed and applied.

public void AddForceAtPosition(FPVector3 force, FPVector3 position, Transform3D* transform)
public void AddImpulseAtPosition(FPVector3 force, FPVector3 position, Transform3D* transform)
// Applies the force/impulse at the position specified while taking into account the CoM.
Angular and linear momentum of the PhysicsBody can be affected by applying:
- forces; or
- impulses.
Although they are similar, there is a key different; forces are applying over a period of time, while impulses are immediate. Think of them as:
- Force = Force per deltatime
- Impulse = Force per frame
Note: In Quantum deltatime is fixed and depended on the simulation rate set in Simulation Config asset.
An impulse will produce the same effect, regardless of the simulation rate. However, a force depends on the simulation rate - this means applying a force vector of 1 to a body at a simulation rate of 30, when increasing the simulation rate to 60 the deltatime with be half, thus the integrated force will be halved as well.
Generally speaking, it is advisable to use an impulse when a punctual and immediate change is meant to take place; while a force should be used for something that is either constantly, gradually, or applied over a longer period of time.
Initializing the Components
To initialize a PhysicsBody as either a Dynamic or Kinematic body, use the respective Create functions. These methods are accessible via the PhysicsBody2D and PhysicsBody3D classes, e.g.:
- PhysicsBody3D.CreateDynamic
- PhysicsBody3D.CreateKinematic
ShapeConfigs
To initialize PhysicsCollider and PhysicsBody via data-driven design, use the ShapeConfig types (Shape2DConfig, and Shape3DConfig). These structs can be added as a property to any Quantum data-asset, editable from Unity (for shape, size, etc).
C#
// data asset containing a shape config property
partial class CharacterSpec {
  // this will be edited from Unity
  public Shape2DConfig Shape2D;
  public Shape3DConfig Shape3D;
  public FP Mass;
}
When initializing the body, we use the shape config instead of the shape directly:
C#
// instantiating a player entity from the Frame object
var playerPrototype = f.FindAsset<EntityPrototype>(PLAYER_PROTOTYPE_PATH);
var playerEntity = playerPrototype.Container.CreateEntity(f);

var playerSpec = f.FindAsset<CharacterSpec>("PlayerSpec");

var transform = Transform2D.Create();
var collider = PhysicsCollider2D.Create(playerSpec.Shape2D.CreateShape(f));
var body = PhysicsBody2D.CreateKinematic(playerSpec.Mass);

// or the 3D equivalent:
var transform = Transform3D.Create();
var collider = PhysicsCollider3D.Create(playerSpec.Shape3D.CreateShape())
var body = PhysicsBody3D.CreateKinematic(playerSpec.Mass);

// Set the component data
f.Set(playerEntity, transform);
f.Set(playerEntity, collider);
f.Set(playerEntity, body);
Enabling Physics Callbacks
An entity can have a set of physics callbacks associated with it. These can be enabled either via code or in the Quantum Entity Prototype's PhysicsCollider component.
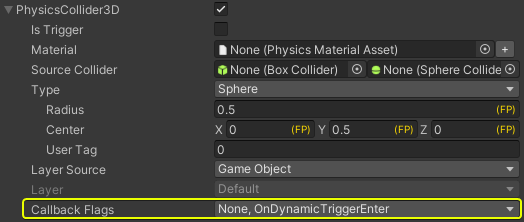
For information on how to set the physics callbacks in code and implement the respective signals, please refer to the Callbacks entry in the Physics manual.
Kinematic
There are 4 different ways for a physics entity to have kinematic-like behaviour:
By having only a
PhysicsCollidercomponent. In this case the entity does not have a PhysicsBody component; i.e. no mass, drag, force/torque integrations, etc... . It is possible to manipulate the entity transform at will, however, when colliding with dynamic bodies, the collision impulses are solved as if the entity was stationary (zeroed linear and angular velocities).By disabling the
PhysicsBodycomponent. When setting theIsEnabledproperty on a PhysicsBody to false, the physics engine will treat the entity in the same fashion as presented in Point 1 - i.e as having only a collider component. No forces or velocities are integrated. This is suitable for the body to behave like a stationary entity temporarily and keep its config (mass, drag coefficients, etc) when re-enabling it at a later point.By setting the
IsKinematicproperty on aPhysicsBodycomponent to true. In this case the physics engine will not affect the PhysicsBody itself, but the body's linear and angular velocities will still affect other bodies when resolving collisions. Use this to control the entity movement instead of letting the physics engine do it, knowing that moving an entity and controlling its body's velocity manually might be needed, while still having other dynamic bodies react to it.By initializing the
PhysicsBodywithCreateKinematic. If the body is expected to behave as kinematic during its entire lifetime, simply create it as a kinematic body. This will have the PhysicsBody behave like in 3 from the very beginning. If the body needs to eventually become dynamic one, create a new one with theCreateDynamicmethod and setIsKinematic = true. Setting IsKinematic to true/false and re-initializing the PhysiscBody component as dynamic/kinematic can be done seamlessly at any time.
The PhysicsCollider Component
Disabling / Enabling the Component
T PhysicsCollider component is equipped with an Enabled property. When setting this property to false, the entity with the PhysicsCollider will be ignored in the PhysicsSystem.
As the PhysicsBody requires an active PhysicsCollider, it will be effectively disabled as well.
Changing the Shape at Runtime
It is possible to change the shape of a PhysicsCollider after it has been initialized.
C#
var collider = f.Get<PhysicsCollider3D>(entity);
collider.Shape = myNewShape;
f.Set(entity, collider);
When a PhysicsBody is first added, it calculates the inertia and CoM based on the shape of the PhysicsCollider. As such it is recommended to call ResetInertia and ResetCenterOfMass after changing the collider's shape.
C#
// following the snippet above

var body = f.Get<PhysicsBody3D>(entity);
body.ResetCenterOfMass(f, entity); // Needs to be called first
body.ResetInertia(f, entity); // Needs to be called second
f.Set(entity, body);
ResetCenterOfMass in particular needs to be called if any of the following is true for the old and/or new shape:
- the shape has a position offset
- the shape is a compound shape
- the center of mass has an offset