Quantum XR

Overview
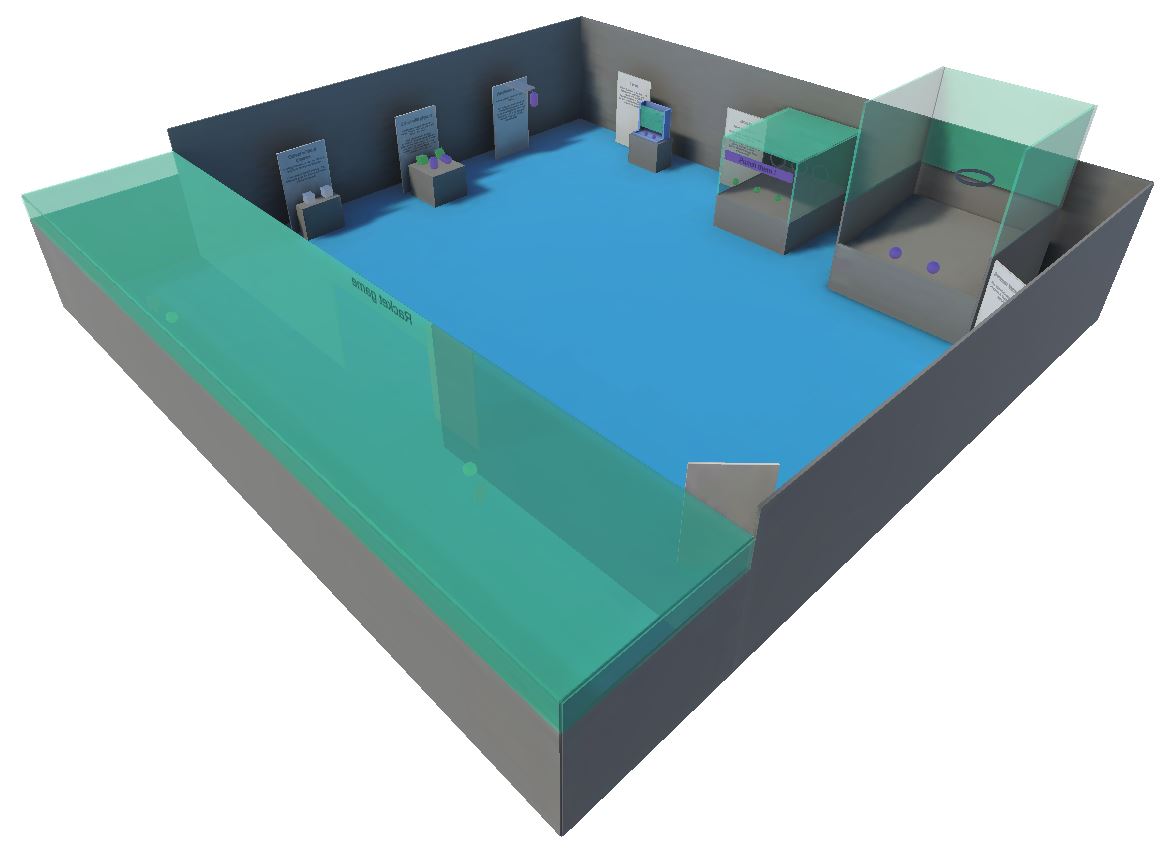
The Quantum XR technical sample demonstrates how to use Quantum engine for XR games or applications.
So, it offers solutions for managing the space position synchronization of XR devices with a smooth display, whereas Quantum is designed to synchronize inputs (and not spatial position).
Also, a few physics-based mini-games are also available (basket ball, punching ball, tennis, etc.) to show how easy and fast they are to implement in a multi-user experience thanks to the Quantum engine.
Before You start
- The project has been developed with Unity 2022.3 and Quantum 3.0
- To run the sample, first create a Quantum AppId and a Voice AppId in the PhotonEngine Dashboard and paste them it into the
App Id QuantumandApp Id Voicefields in Photon Server Settings (reachable from the Tools/Quantum menu). Then load the scene and pressPlay.
Download
| Version | Release Date | Download | |
|---|---|---|---|
| 3.0.0 | Sep 16, 2024 | Quantum XR 3.0.0 Build 508 | |
Handling Input
Meta Quest
- Teleport : press A, B, X, Y, or any stick to display a pointer. You will teleport on any accepted target on release
- Grab : first put your hand over the object and grab it using controller grab button
- Tractor beam : aim at the object you want to attract and press the trigger on the joystick. The pressure on the trigger button will determine the force of attraction. Three levels are defined: slow attraction, fast attraction or standby (equivalent to a remote grab).
Global architecture
Device position synchronization
In an immersive application, the rig describes all the mobile parts that are required to represent an user, usually both hands, an head, and the play area (it is the personal space that can be moved, when an user teleports for instance).
In this sample, an "hardware rig" collects device data to know the position of all the rig parts relatively to the rig (in fact, to the play area).
Those data are then sent to the Quantum engine through the input.
There, Quantum systems move entities having components representing the same rig parts:
- The rig itself is moved accordingly to the user inputs (teleportation here, but stick based locomotion could be used too).
- The head and hands are moved relatively to the rig component, based on their local positions passed through the input
Then views in Unity display those entities.
Finally, the rig view position is used to move back the hardware rig: it is needed as we want the camera to move accordingly to the rig position changes decided in the Quantum systems, and the camera position is moved in the scene by changing the rig (playarea) position in XR.

Hand smoothing
In an usual Quantum application, the input contains data that are useful for prediction frames: you can make the assumption that if a player moves forward, it may have continued to do so. The input describes the movement, not the final position, and so this movement can be reused in prediction.
In VR, we need to share in the input the head and hands local position. These are final positions, not movement, and cannot be used directly to predict movements during predicted frames.
There are several way to solve this (the hands case are mostly described here, as they are the most problematic, but a similar approach has to be taken for the head):
- We can ask views to interpolate between verified frames. It would include a delay. For the local user, the lack of responsiveness can be compensated by extrapolating hands position (overriding the interpolated hand position with the actual current hardware state), but the induced discrepancy with the Quantum state is not suitable in many cases (reactive physics involving hands, …)
- We can store the input, and slightly delay their usage, interpolating as needed between the stored position with a delay. This time based interpolation on the Quantum side itself works well, while still preserving the physics, but it also introduces a delay that might be problematic in some cases.
Here, the default approach taken has been to:
- Try to actually predict the hand move based on the latest info received in a verified frame. The prediction frames then actually really tries to predict the position of hands (based on the latest hand velocity for instance)
- Naturally, those predictions will often fail, so a smoothing based on the latest position is introduced to avoid making corrections that would be too much visible.
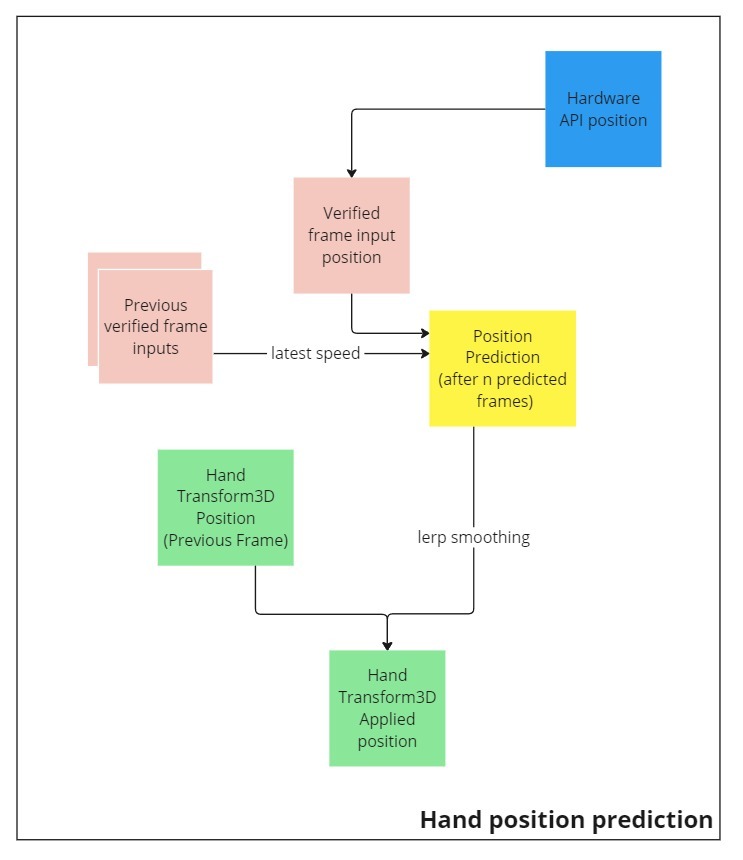
These 1) and 2) approaches are antagonistic, in the sense that 1) tries to guess the future, while the 2) pushes it back a bit in the past.
The current implementation offers a specific balance, but this has to be tailored to an actual game gameplay.
For instance, the default approach chosen is slightly not reactive enough for very fast changes, like in a racket game, so a hand uses a different configuration while grabbing rackets.
Physics grabbing
In this sample, the goal for most objects has been to:
- Be grabbable by the hands
- Be blocked by colliding surfaces and objects.
To do so, the grabbing logic has to rely on forces, so that the collided surfaces could push back against the grabbing logic: in the real life, our hand can go through those virtual blocking surfaces, but we don’t want the grabbed objects to do so.
To achieve this:
- The hand entities move freely, unblocked by surfaces
- The grabbed objects try to follow the hand position by applying forces
- To determine those forces, and to have smooth trajectories, the grabbing forces are computed through a dedicated simple PID controller (see more details here, or the very clear explanation video here)
- The integration factor of the PID controller is disabled (by default) while the grabbed object is collided a surface, to avoid adding a "memory" of the fact that it was not able to reach its destination
Physics hands
For some object, we wanted to demonstrate pushing or punching them directly, without a grabbed object.
As we have chosen to let the hand entities move freely and follow the actual real life hand position, there are not suitable to be physics body in Quantum.
So, we have added physics hands entities.
Those physics hands are very similar to grabbed object:
- They follow the hand position, but constantly
- This following is based on the same PID controller-based forces
To limit the object that can be collided by those physics hands, we have setup a special collision matrix, to have control on which object could be punched. The physics hands are in the PhysicsHands layer, and can only interact with objects in the PhysicsHandsPushable layer.
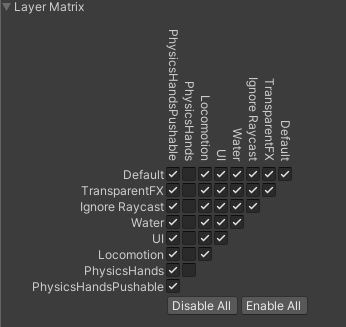
This is required, as the physics hand collider is not animated here, they have a simple box collider, so it is quite hard to grab something that can be punched.
If needed, this could be changed by using a compound collider, and changing its parts position according to the hand state. See the Changing the Shape at Runtime documentation.
Hand view: position override and pseudo-haptic feedback
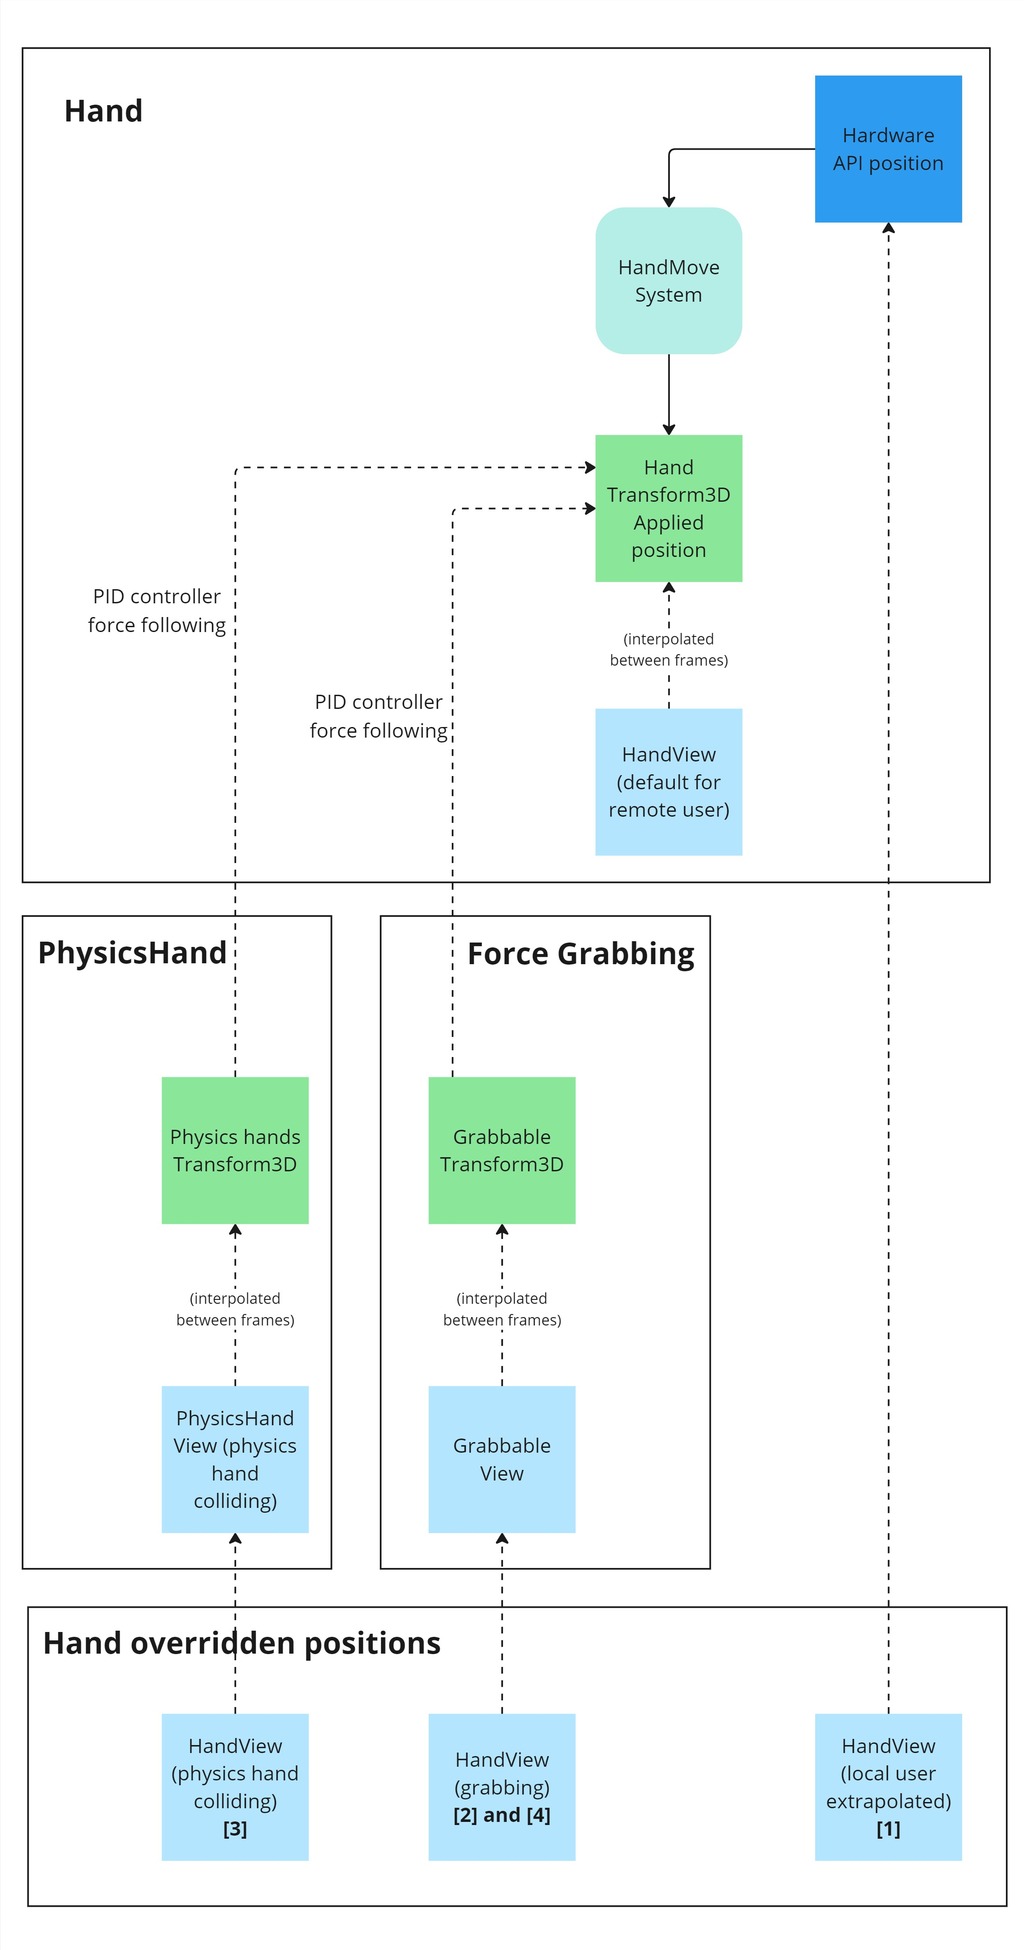
To provide a more natural display of an user hand, the hand position is overridden in the HandView in some cases:
- (1) in general case for the local user, to display the most up to date and reactive hand position from the hardware data
- (2) when a physics grabbing occurs, to ensure that the hand "sticks" on the grabbed object at the position it was initially grabbed (we don't want to make visible that the grabbable object is following the hand with forces, involving a slight offset)
- (3) when the physics hand is colliding, and blocked, by a surface
- (4) when the physics grabbed object is colliding and blocked by a surface
Some of these cases ( (1) and (2) ) will be silently overridden, while for the others, we want the user to "feel" the discrepancies between the real life hand position and the displayed position.
If we display a ghost hand at the position of the real life position, and apply an haptic feedback proportional to the discrepancy, the user can "feel" the issue, their brain interpreting this as an actual resistance.
This "pseudo-haptic feedback" (see here or there for research papers on this domain) solves the uncomfort of having your visual hand not matching your real life hand position, while providing a partial physical resistance simulation.
Regarding the used hand position:
- (1) Extrapolation for the local user in general cases: the hardware hand position is used
- (2) and (4) Physics grabbing: the grabbed object is now the reference, and the hand is placed on the object so that the initial grabbed offset is preserved
- (3) Physics hands colliding: the physics hands now becomes the reference position for the hand representation
Teleportation
In order to provide a good UX, we can not simply change the rig position in Quantum when an user is teleporting.
Indeed, it is a good practice to hide the scene with a fade to black before moving the player to avoid kinetosis due to the change in position.
That's why, teleporting a player involves several steps:
- first, we read information from the controllers to check whether the teleport button has been activated,
- then, inputs are sent to Quantum, so the locomotion system can checks each hand's input to update the
LocomotionRayStatestate machine of each hand entity. If a teleport request occurs, an event is sent to Unity to start the fade-in. - when the fade-in is complete, a command is sent to Quantum to move the rig's elements,
- once teleportation is complete, an event is sent to Unity to do the fade-out.
During this process, the visual of the ray is managed on the Unity side based on the LocomotionRayState state machine.
More details in the RayAndLocomotionSystem section below.
Tractor beams
To be able to manipulate an object at a distance, teleportation beams can also be used as tractor beams, by pointing at a grabbable object while pressing the trigger button on a controller.
The attraction is based on the same PID controller-based forces used for physics grabbing and physics hands.
Based on the trigger button pressure level, there is 3 level of attraction:
- fast attraction: when the trigger is almost fully pressed, the objected will be attracted to a point quickly converging to the user hand
- distance lock: when the trigger is just slightly pressed, the object will be attracted to a point staying at a constant distance. It allows to launch the object laterally if needed, with a whip-like move
- slow attraction: in between those pressure levels, the object will be attracted to a point slowly moving toward the hand
The ray configuration file includes an option to disable the gravity while the beam is active (enabled by default).
Non-physics grabbing
In addition to physics grabbing, which suits the best the advanced physics capabilities of Quantum, a non-physics grabbing option is included in the sample.
For entities configured to use this grabbing mode, when grabbed, they will exactly match the hand position, even if it implies going through surfaces. In consequence, this mode should only be used on entities which do not have physics bodies.
The goal is to have a grabbing position, and an ungrabbing position, that exactly matches the real life position of the user hand (not including the small differences induced by the physics in the physics grabbing, nor the hand smoothing logic).
To do so, this grabbing mode rely on the following additions:
- when the object is grabbed, for the local user, its position is extrapolated, as it is for the hands: the grabbed object is displayed relatively to the real life hand position (hardware hand position), no matter its Quantum view interpolation. When the grabb occurs, the real life grabbing position (the offset between the grabbed object and the hardware hand transform position) is sent through a command to the Quantum core, so that the grabbing systems can slightly adapt the grabbing offset to match the real life position.
- similarly, when an object is ungrabbed, its precise ungrab position is sent through a command to Quantum, to ensure that the ungrabbed object move to this exact position
Prediction culling
It's important to save CPU resources on limited devices like autonomous XR headsets.
So, prediction culling is activated in this sample : it means that no Quantum prediction and rollback are computed for objects that are not in the player's field of vision.
To do so, the PredictionCulling component is added on the camera of the hardware rig.
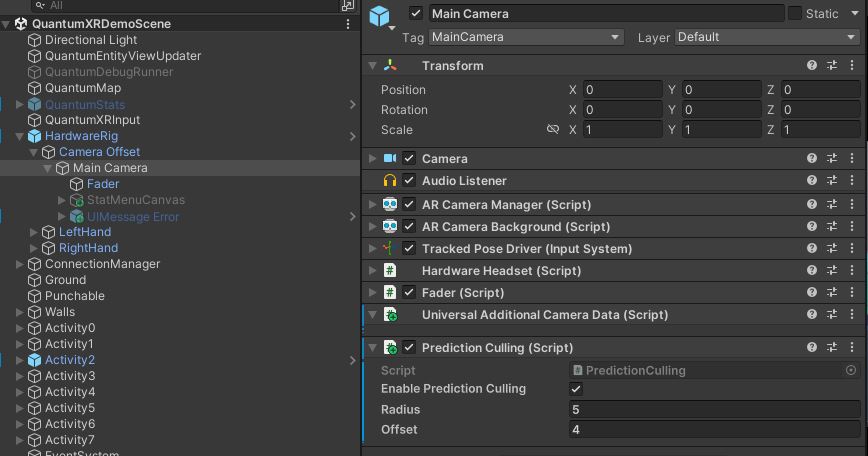
It consists in setting up a prediction area in front of the user. The radius of this area must be slightly larger than the offset, to include the player's hands and objects on the near sides.
C#
        if (enablePredictionCulling)
        {
            centerPosition = transform.position + transform.forward * offset;
            QuantumRunner.Default.Game.SetPredictionArea(centerPosition.ToFPVector3(), radius.ToFP());
            wasCulled = true;
ConnectionManager
Due to the headset rendering and interactions, this sample don't use the usual Quantum menu.
So the sample provide a very simple ConnectionManager to initiate the connection from the QuantumXRDemoScene scene.
It will create a room if none is created, and join an existing one randomly otherwise.
This connection manager always starts an online connection. So to be able to do development test alone, it provides the option to add a "Dev App Version Prefix" to the AppVersion, to make sure to only see people having the same prefix
It does the following:
- it starts the underlying RealTime session with
MatchmakingExtensions.ConnectToRoomAsync - then it starts the
QuantumrunnerwithSessionRunner.StartAsync, passing the config (with the systems config, the simulation config, ...) stored inRuntimeConfig runtimeConfig - finally, when the game is started, it add the local player with
game.AddPlayer, passing the player data stored in theRuntimePlayer runtimePlayer
Core systems details
HandMoveSystem and HeadMoveSystem
Those systems deal with the rig parts (head and hands) movements.
Both have the same logic:
- They read the input to find the local position of the rig part
- They determine if it should adapt those values (smoothing, predictions, …)
- They apply the local position as an offset to the rig position
They use position smoothing config files, PositionSmoothingConfig (HandPositionSmoothingConfig for hands, which offers additional options regarding the view position override), to determine how to adapt the input position.
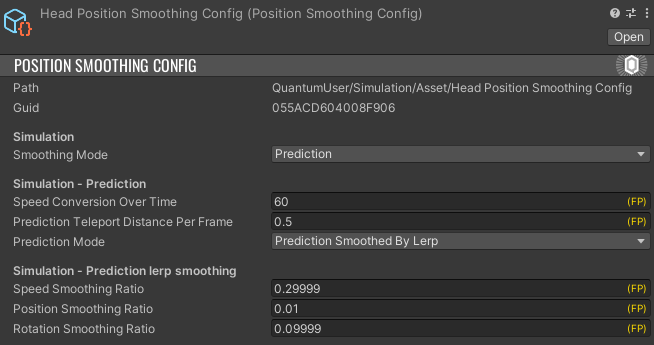
2 modes are available:
- Direct input: the input local position are used as they are, with no modifications
- Prediction (default): the system tries to guess where a rig part might have moved based on its latest position and speed
Prediction
The logic of the prediction is to store during verified frame the local rig part position in a buffer
C#
if (f.IsVerified)
{
    filter.Head->PositionsBuffer.Insert(headLocalization, f.Number);
}
Then, an average velocity is computed :
C#
FPVector3 accumulatedDeltaPosition = FPVector3.Zero;
for (int i = 0; i < (UsedEntries -1); i++)
{
    accumulatedDeltaPosition = accumulatedDeltaPosition + LastPositions[i + 1] - LastPositions[i];
}
RigPartPosition predictedLocation = default;
var ratio = (FP)1 / (UsedEntries - 1);
var lastInstantSpeed = accumulatedDeltaPosition * ratio;
Then we apply this speed for each frame since the last verified frame, but to take into account that the further we are from the verified frame, the less we can trust the computed speed, the speedConversionOverTime (from 0 to 100) decrease the usage of this verified frame speed.
C#
FPVector3 cumulatedMove = FPVector3.Zero;
var distancePerFrame = lastInstantSpeed;

while (remainingFrameToPredict > 0)
{
    cumulatedMove = cumulatedMove + distancePerFrame;
    distancePerFrame = distancePerFrame * config.speedConversionOverTime / 100;
    remainingFrameToPredict--;
}
Lerp smoothing
When prediction is selected, an additional lerp smoothing can be added (it is, by default).
This smoothing lerps 2 values:
- The speed: it is important to have a smooth hand speed, to avoid having visual artefacts
- The position: we of course want to be sure to move from the current position to the predicted position
All lerps (speed, rotation, and position) can be tuned through their respective PositionSmoothingConfig settings.
C#
if (previousSpeed != FPVector3.Zero)
{
    lastInstantSpeed = FPVector3.Lerp(previousSpeed, lastInstantSpeed, config.speedSmoothingRatio);
}
var continuationPosition = currentPosition + lastInstantSpeed;

smoothedPredictedLocation.Position = FPVector3.Lerp(continuationPosition, predictedLocation.Position, config.positionSmoothingRatio);
smoothedPredictedLocation.Rotation = FPQuaternion.Slerp(currentRotation, predictedLocation.Rotation, config.rotationSmoothingRatio);

previousSpeed = lastInstantSpeed;
GrabberSystem and GrabbableSystem
Those system deals with the grabbing of entities having a Grabbable component.
In the GrabberSystem, entities having a Grabber components (hands entities) are filtered.
The grabbing status is checked from the input, and can trigger grabs of hovered grabbables, and ungrabs of previously grabbed grabbable.
The hovering over a grabbable is detected through the Physics3D system signals, OnTriggerEnter3D and OnTriggerExit3D.
C#
#region Hovering detection
public void OnTriggerEnter3D(Frame f, TriggerInfo3D info)
{
    var grabberEntity = info.Entity;
    var grabbableEntity = info.Other;
    if (f.Unsafe.TryGetPointer<Grabbable>(grabbableEntity, out var grabbable) && f.Unsafe.TryGetPointer<Grabber>(grabberEntity, out var grabber))
    {
        // Grabber hovering a grabbbable
        grabber->HoveredEntity = grabbableEntity;
    }
}

public void OnTriggerExit3D(Frame f, ExitInfo3D info)
{
    var grabberEntity = info.Entity;
    var grabbableEntity = info.Other;
    if (f.Unsafe.TryGetPointer<Grabbable>(grabbableEntity, out var grabbable) && f.Unsafe.TryGetPointer<Grabber>(grabberEntity, out var grabber))
    {
        // Grabber stop hovering a grabbbable
        if (grabber->HoveredEntity == grabbableEntity)
        {
            grabber->HoveredEntity = EntityRef.None;
        }
    }
}
#endregion
During grab and ungrab, both the Grabber and Grabbable components reference their counterpart entities
Then, in the GrabbableSystem the Grabbable entity "follows" the grabber entity. Either with position following (the object will follow the hand position, passing through objects), or with force based following, forces driving the move toward the grabbing hand.
The force grabbing logic can be configured through ForceFollowConfig configuration files
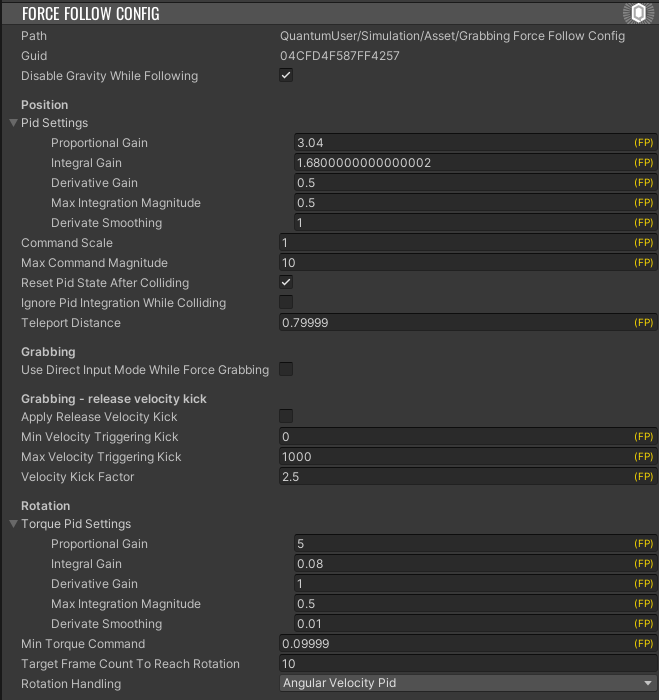
This configuration file notably change the logic of the PID controller determining the applied following forces.
C#
var error = targetPosition - followingTransform->Position;

if (error.Magnitude > config.teleportDistance)
{
    // Teleport due to distance
    positionPid.Reset();
    followingBody->Velocity = FPVector3.Zero;
    followingTransform->Position = targetPosition;
}
else
{
    var command = positionPid.UpdateCommand(error, f.DeltaTime, config.pidSettings, ignoreIntegration: config.ignorePidIntegrationWhileColliding && isColliding);
    var impulse = FPVector3.ClampMagnitude(commandScaleRatio * config.commandScale * command, config.maxCommandMagnitude) * followingBody->Mass;
    followingBody->AddLinearImpulse(impulse);
}
The configuration file also allows to state if we want to artificially increase the ungrab velocity (to simplify launching objects):
C#
// Release velocity kick
if (config.applyReleaseVelocityKick)
{
    var velocityMagnitude = grabbableBody->Velocity.Magnitude;
    if (config.minVelocityTriggeringKick <= velocityMagnitude && velocityMagnitude <= config.maxVelocityTriggeringKick)
    {
        grabbableBody->Velocity = config.velocityKickFactor * grabbableBody->Velocity;
    }
}
PhysicsHandsSystem
The PhysicsHandSystem applies the same logic than the Grabbablesystem for force following grabbable, but for 2 invisible colliders always following the hand.
The only specificities are that:
- The physics hands collider is disabled when grabbing an object, to stop any haptic feedback
- If a grabbable was colliding before being grabbed, we cancel this collision info stored in the Grabbable component (as, since we disable the collider,
OnCollision3Dmight not be triggered properly in theGrabbableSystem)
RayAndLocomotionSystem
The following chapters details the process for teleporting the player.
Please note that the player rotation is not described here to simplify the reading but it is very similar.
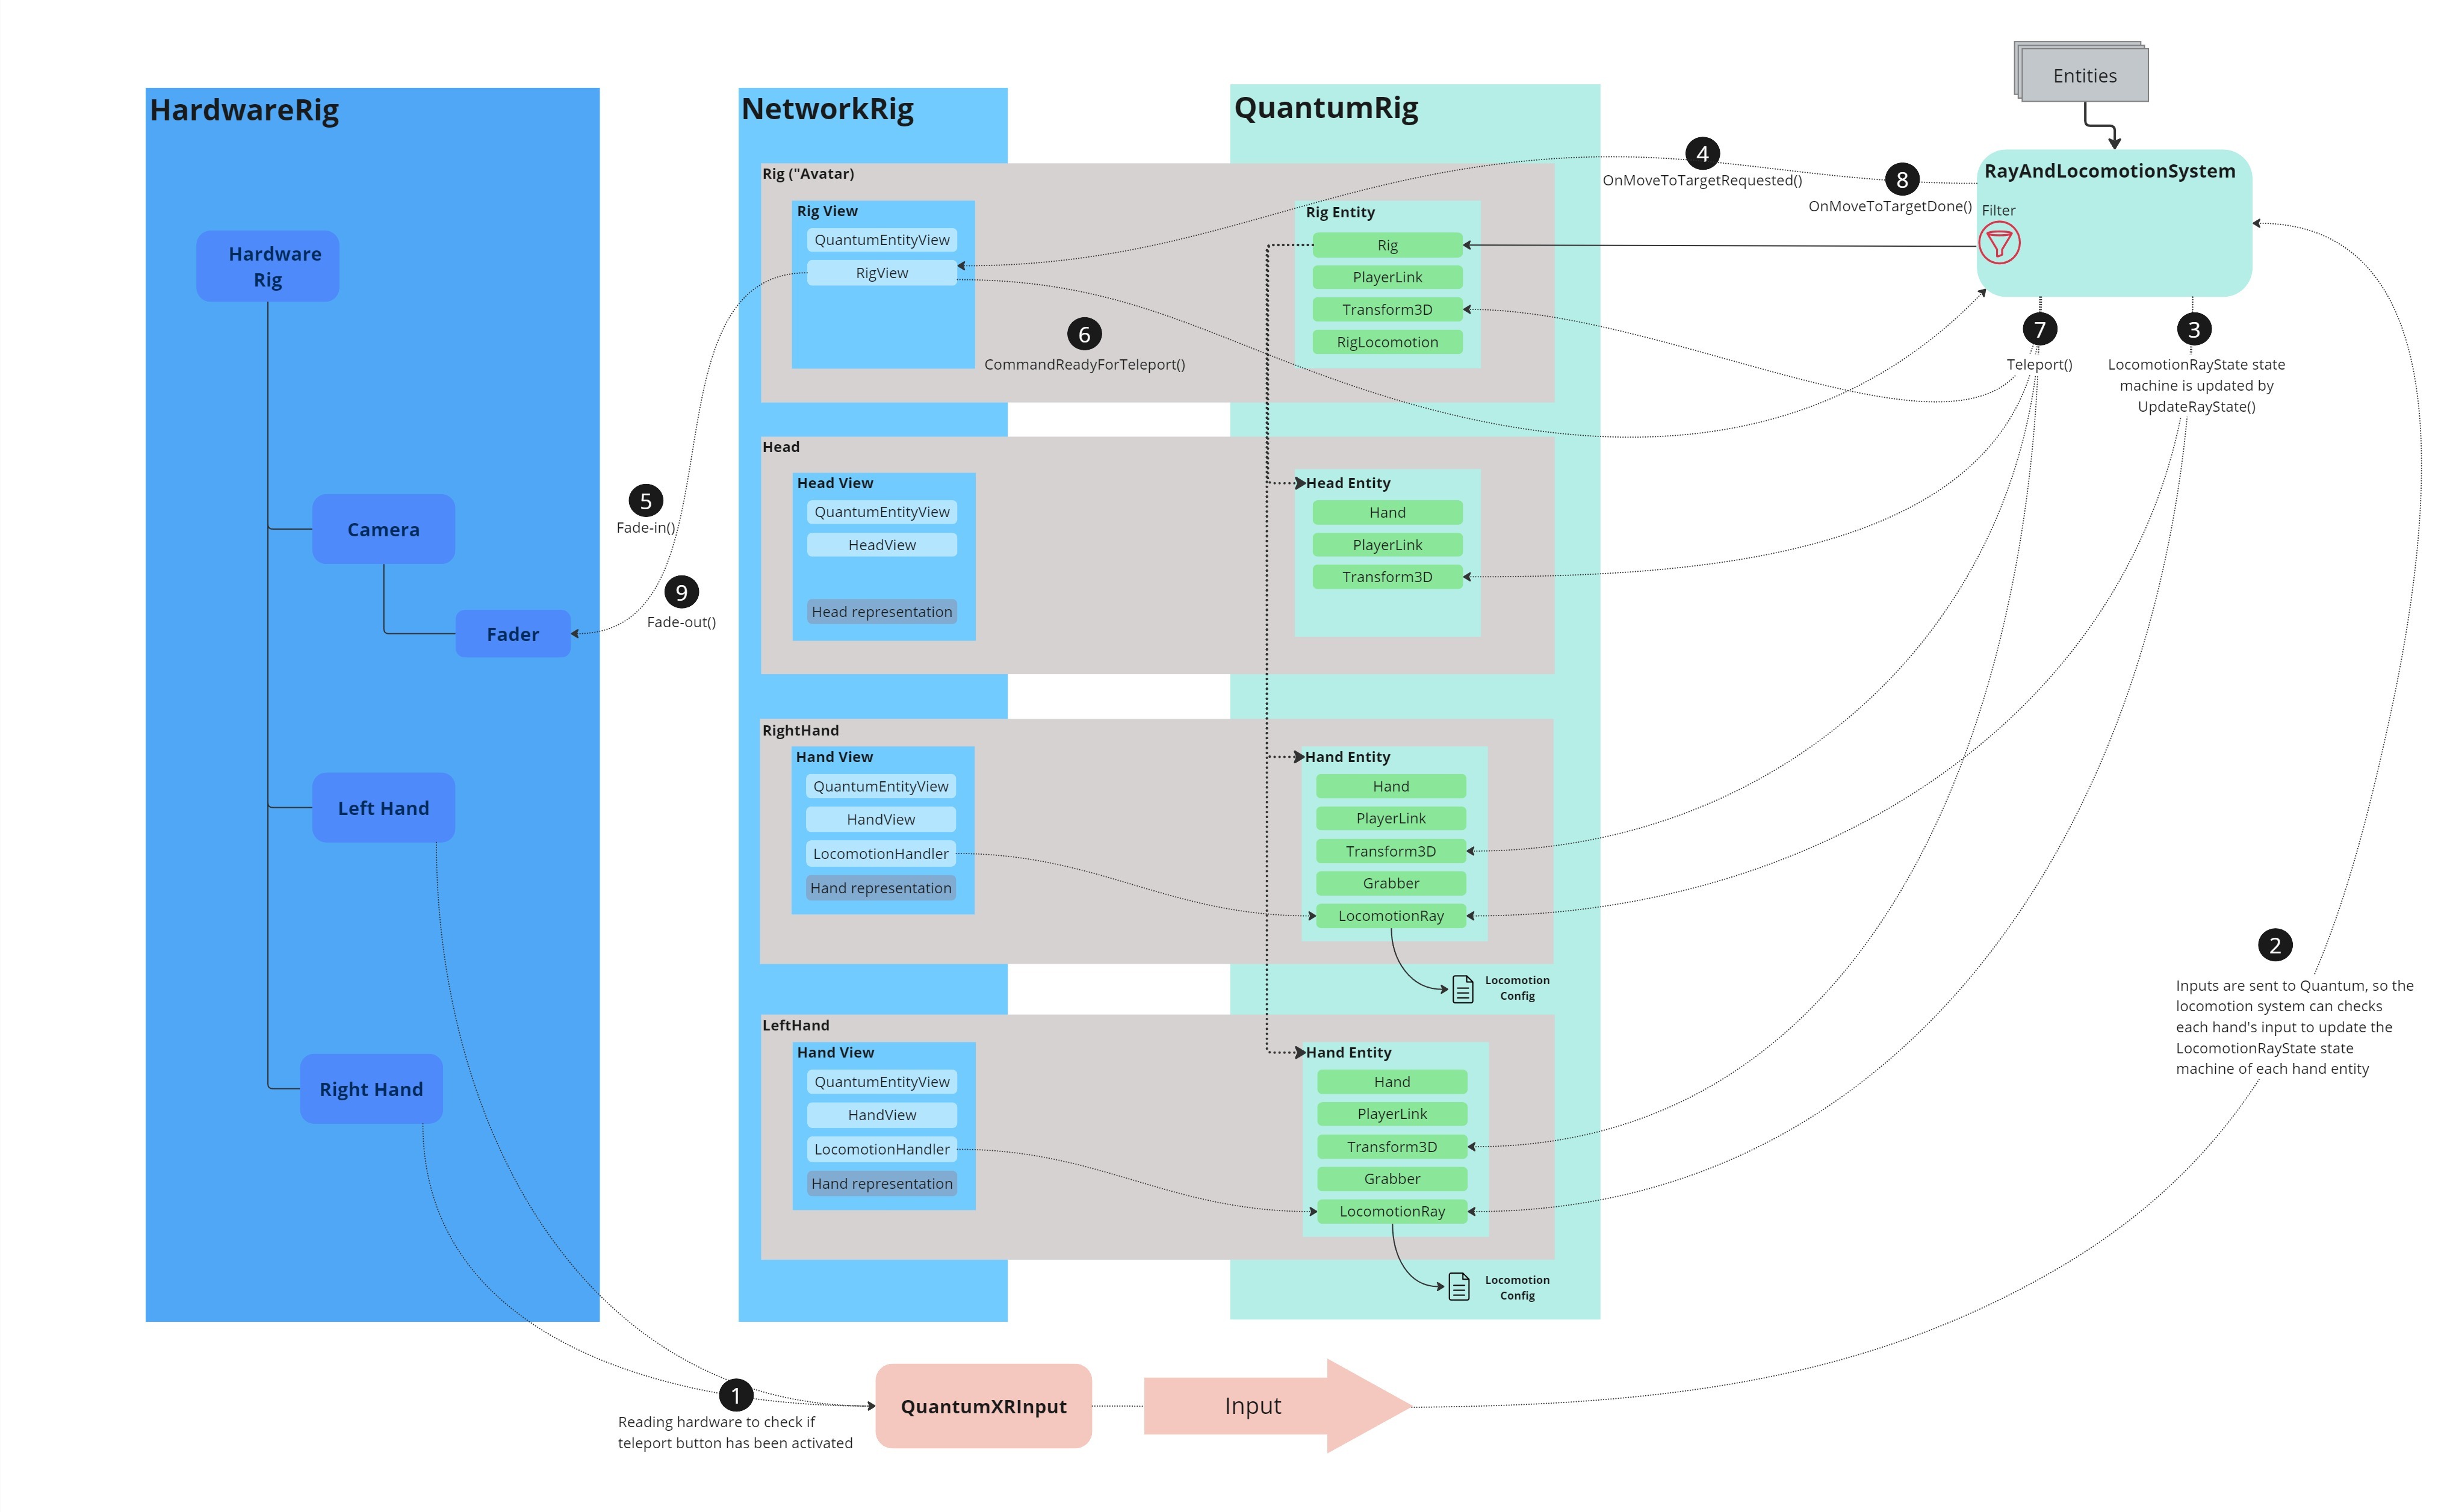
Reading hardware info
The input QTN file defines the input data to be synchronized.
In order to reduce the bandwidth, FPVector3 & FPQuaternion are replaced by optimized versions that only serialize the 32 LSBs of the raw value, instead of the full 64 bits.
This operation is lossless as long as values are within the FP usable range (-32K, 32K).
For each hand, the input includes the the ray status : LeftHandIsRayEnabled & RightHandIsRayEnabled.
C#
        import struct FPVector3RawInt(12);
        import struct FPQuaternionRawInt(16);

        input
        {
            // Headset
            FPVector3RawInt HeadsetPosition;     // Local position relatively to the rig root
            FPQuaternionRawInt HeadsetRotation;  // Local position relatively to the rig root
            RigDetectionState DetectionState;    // Rig parts state

            // LeftHand
            FPVector3RawInt LeftHandPosition;     // Local position relatively to the rig root
            FPQuaternionRawInt LeftHandRotation;  // Local position relatively to the rig root
            Button LeftHandIsRayEnabled;          // RayCast Status
            Button LeftHandIsGrabbing;
            Byte LeftHandGripLevel;
            Byte LeftHandTriggerLevel;
            button LeftHandIsThumbTouched;
            button LeftHandIsIndexTouched;

            // RightHand
            FPVector3RawInt RightHandPosition;     // Local position relatively to the rig root
            FPQuaternionRawInt RightHandRotation;  // Local position relatively to the rig root
            Button RightHandIsRayEnabled;          // RayCast Status
            Button RightHandIsGrabbing;
            Byte RightHandGripLevel;
            Byte RightHandTriggerLevel;
            button RightHandIsThumbTouched;
            button RightHandIsIndexTouched;
        }
The QuantumXRInput script is responsible for collecting Unity inputs and passing them into the Quantum engine
C#
        private void OnEnable()
        {
            QuantumCallback.Subscribe(this, (CallbackPollInput callback) => PollInput(callback));
        }

        public void PollInput(CallbackPollInput callback)
        {
            Quantum.Input input = new Quantum.Input();
            if (hardwareRig == null)
            {
                hardwareRig = FindObjectOfType<HardwareRig>();
            }
            if (hardwareRig)
            {
                var headsetPosition = hardwareRig.transform.InverseTransformPoint(hardwareRig.headset.transform.position).ToFPVector3();
                var headsetRotation = (Quaternion.Inverse(hardwareRig.transform.rotation) * hardwareRig.headset.transform.rotation).ToFPQuaternion();
                input.HeadsetPosition = (FPVector3RawInt)headsetPosition;
                input.HeadsetRotation = (FPQuaternionRawInt)headsetRotation;

                var leftHandInfo = FillHandInfo(hardwareRig.leftHand);
                input.LeftHandPosition = (FPVector3RawInt)leftHandInfo.Position;
                input.LeftHandRotation = (FPQuaternionRawInt)leftHandInfo.Rotation;
                input.LeftHandIsRayEnabled = leftHandInfo.IsRayEnabled;
                input.LeftHandIsGrabbing = leftHandInfo.IsGrabbing;
                input.LeftHandGripLevel = leftHandInfo.Buttons.GripLevel;
                input.LeftHandTriggerLevel = leftHandInfo.Buttons.TriggerLevel;
                input.LeftHandIsThumbTouched = leftHandInfo.Buttons.IsThumbTouched;
                input.LeftHandIsIndexTouched = leftHandInfo.Buttons.IsIndexTouched;

                var rightHandInfo = FillHandInfo(hardwareRig.rightHand);
                input.RightHandPosition = (FPVector3RawInt)rightHandInfo.Position;
                input.RightHandRotation = (FPQuaternionRawInt)rightHandInfo.Rotation;
                input.RightHandIsRayEnabled = rightHandInfo.IsRayEnabled;
                input.RightHandIsGrabbing = rightHandInfo.IsGrabbing;
                input.RightHandGripLevel = rightHandInfo.Buttons.GripLevel;
                input.RightHandTriggerLevel = rightHandInfo.Buttons.TriggerLevel;
                input.RightHandIsThumbTouched = rightHandInfo.Buttons.IsThumbTouched;
                input.RightHandIsIndexTouched = rightHandInfo.Buttons.IsIndexTouched;

                input.DetectionState = RigDetectionState.Detected;
            }
            else
            {
                Debug.LogError("Input polled while hardware rig is not found");
                input.DetectionState = RigDetectionState.NotDetected;
            }

            callback.SetInput(input, DeterministicInputFlags.Repeatable);
        }
Quantum teleport request processing
The locomotion QTN file defines the LocomotionRay component.
C#
component LocomotionRay{
    FPVector3 PositionOffset;
    FPVector3 RotationOffset;
    [ExcludeFromPrototype]
    LocomotionRayState State;
    [ExcludeFromPrototype]
    FPVector3 Target;
    AssetRef<LocomotionConfig> Config;
    [...]
}

enum LocomotionRayState{
    NotPointing,
    PointingValidTarget,
    PointingInvalidTarget,
    MoveToTargetRequested,
    AttractableGrabbableTargeted,
    AttractingGrabbable
}
This component must be added on each hand entity.
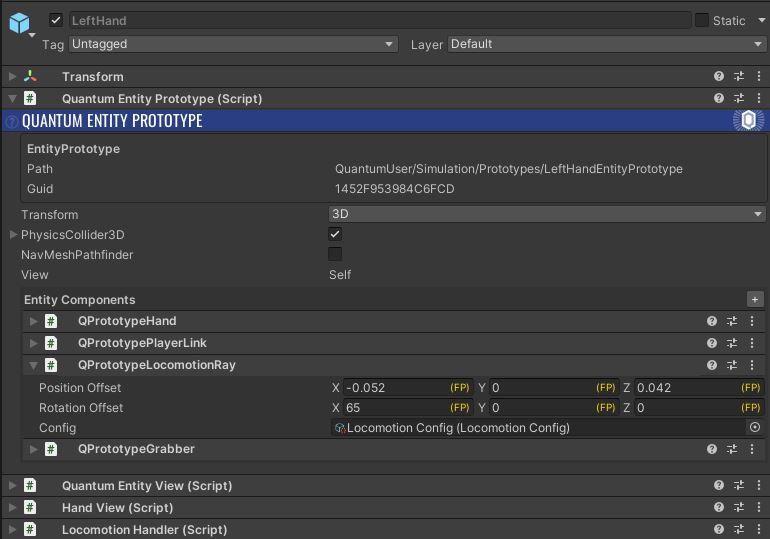
So, on the Quantum side, at each Update(), the RayAndLocomotionSystem can read the input provided by Unity and update the locomotion ray state.
C#
    public override void Update(Frame f, ref RayAndLocomotionSystem.Filter filter)
        {
            var input = f.GetPlayerInput(filter.PlayerLink->Player);
            [...]

            if (Rig.TryGetComponents<LocomotionRay>(f, filter.Rig->LeftHandEntity, out var leftHandLocomotionRay, out var leftHandTransform) == false)
                return;
            if (Rig.TryGetComponents<LocomotionRay>(f, filter.Rig->RightHandEntity, out var rightHandLocomotionRay, out var rightHandTransform) == false)
                return;

            var leftHandInfo = HandInfo.HandInfoFromInput(HandSide.Left, input);
            var rightHandInfo = HandInfo.HandInfoFromInput(HandSide.Right, input);

            UpdateRayState(f, ref filter, input->LeftHand, leftHandTransform, filter.Rig->LeftHandEntity, leftHandLocomotionRay, out var leftHitEntity);
            UpdateRayState(f, ref filter, input->RightHand, rightHandTransform, filter.Rig->RightHandEntity, rightHandLocomotionRay, out var rightHitEntity);
            [...]
        }
If the player requested a teleport and if the target is a valid target, then the event OnMoveToTargetRequested is raised.
C#
 public unsafe void UpdateRayState(Frame f, ref Filter filter, HandInfo handInfo, Transform3D* handTransform, EntityRef handEntity, LocomotionRay* locomotionRay, out EntityRef hitEntity)
        {
         [...]
            else if (locomotionRay->State == LocomotionRayState.PointingValidTarget)
            {
                // Planning teleport
                locomotionRay->State = LocomotionRayState.MoveToTargetRequested;
                f.Events.OnMoveToTargetRequested(filter.PlayerLink->Player, locomotionRay->Target);
            }
            [...]
        }
Please note that a locomotion and a blocking layer masks can be defined in a LocomotionConfig asset file in order to specify which objects block the raycast or can be used as a teleport target.
Unity prepares the teleportation
On the Unity side, event reception is handled by the RigView.
If the teleport request event has been raised by the local player, a fade to black is started to hide the scene and avoid kinetosis due to the change in position.
When the fade in is complete, Unity informs the Quantum engine thanks to the CommandReadyForTeleport command.
C#
 public class RigView : QuantumEntityViewComponent<XRViewContext>
    {

        private void Start()
        {
            QuantumEvent.Subscribe<EventOnMoveToTargetRequested>(listener: this, handler: MoveToTargetRequested);
            QuantumEvent.Subscribe<EventOnMoveToTargetDone>(listener: this, handler: MoveToTargetDone);
            [...]
        }

        private void MoveToTargetRequested(EventOnMoveToTargetRequested callback)
        {
            if (isLocalUserRig == false) return;
            var movingPlayer = callback.Player;
            var rigPlayer = VerifiedFrame.Get<PlayerLink>(EntityRef).Player;
            if (rigPlayer != movingPlayer) return;
            // fadein
            StartCoroutine(TeleportPreparation());
        }

        IEnumerator TeleportPreparation()
        {
            if (ViewContext.hardwareRig.headset.fader)
            {
                yield return ViewContext.hardwareRig.headset.fader.FadeIn();
            }
            Game.SendCommand(new CommandReadyForTeleport());
        }
Quantum teleportation
At each Update(), the Quantum RayAndLocomotionSystem checks if the CommandReadyForTeleport command occured.
If so, it moves the rig parts to the target position and raised the OnMoveToTargetDone event.
C#
    public override void Update(Frame f, ref RayAndLocomotionSystem.Filter filter)
        {
            [...]
            CheckTeleportAuthorization(f, ref filter, leftHandLocomotionRay, rightHandLocomotionRay, leftHandTransform, rightHandTransform);
            [...]
        }

        void CheckTeleportAuthorization(Frame f, ref Filter filter, LocomotionRay* leftHandLocomotionRay, LocomotionRay* rightHandLocomotionRay, Transform3D* leftHandTransform, Transform3D* rightHandTransform)
        {
            // check command
            var command = f.GetPlayerCommand(filter.PlayerLink->Player) as CommandReadyForTeleport;
            if (command != null)
            {
                LocomotionRay* sourceRay = null;
                if (leftHandLocomotionRay->State == LocomotionRayState.MoveToTargetRequested)
                    sourceRay = leftHandLocomotionRay;
                else if (rightHandLocomotionRay->State == LocomotionRayState.MoveToTargetRequested)
                    sourceRay = rightHandLocomotionRay;

                if (sourceRay != null)
                {
                    Teleport(f, ref filter, sourceRay->Target, leftHandTransform, rightHandTransform);
                    f.Events.OnMoveToTargetDone(filter.PlayerLink->Player, sourceRay->Target);
                    sourceRay->State = LocomotionRayState.NotPointing;
                }
            }
        }
Unity end of teleportation
Like for the OnMoveToTargetRequested event, on the Unity side the RigView is in charge to received the OnMoveToTargetDone event in order to process the fade out and synchronize the hardware rig position to the network rig position set by Quantum engine.
C#
private void MoveToTargetDone(EventOnMoveToTargetDone callback)
        {
            // Check that we are the local user, and that this rig is the one related to the local user, before applying fade and camera moves based on the rig move
            var movingPlayer = callback.Player;
            if (IsLocalRigPLayer(movingPlayer) == false) return;

            // Synchronize hardware rig position to network rig position (ensure that the camera, located in the hardware rig, will follow the actual network head position)
            var rigTransform3D = PredictedFrame.Get<Transform3D>(EntityRef);
            ViewContext.hardwareRig.transform.position = rigTransform3D.Position.ToUnityVector3();
            // fadeout
            StartCoroutine(TeleportEnd());
        }
Ray beam visual
Each hand entity has the LocomotionHandler component.
It is in charge of displaying the ray beam based on the LocomotionRayState state machine of the LocomotionRay entity.
Also, this class implement the IHandViewListener interface to update the ray position when the hand position changed.
Gameplays specific elements
Scoring Gates System
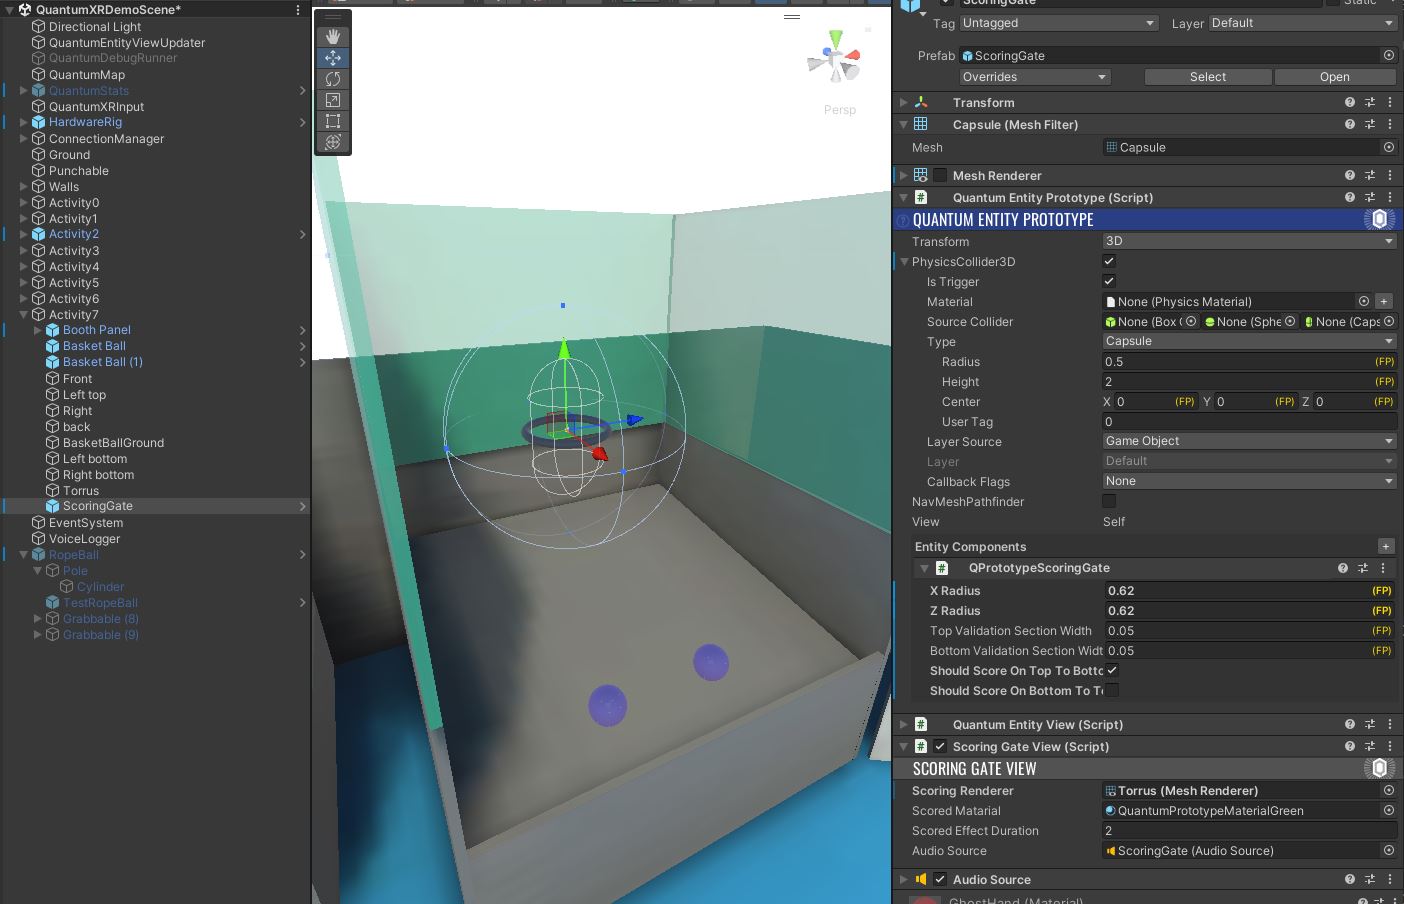
Some games require trajectory analysis to determine whether a player has made a successful shot, i.e. whether the ball enters a defined goal or gate.
To do so, the ScoringGates QTN file defines:
ScoringGatecomponent: it is used to define gate properties (size and direction to mark a point). To add a scoring gate in the scene, a Quantum entity with theScoringGateentity must be added.Scorablecomponent: it must be added the objects (balls) to be thrown into the gate.OnScoreevent is raised when aScorableentity passed through the gate.
Please note that it is possible to define if the ball must enter the gate in a specific direction.
The ball trajectory anaylis is managed by the ScoringGateSystem.
The filter provides all entities with a ScoringGate and the OnTrigger3D() method generates the OnScore event when the ball has passed through the top & the bottom sections.
The ConfigurePhysicsCallbacks() method verifies that the physics callback flags are properly set on the gate.
On Unity side, the ScoringGateView is in charge to change the gate material and play an audio file when the player made a successful shot.
To do so, it subscribes to the Quantum OnScore event and call the Score() method to generate the visual and audio feedbacks.
C#
        private void Start()
        {
            QuantumEvent.Subscribe<EventOnScore>(listener: this, handler: Score);
        }


        private void Score(EventOnScore callback)
        {
            if (callback.scoringGateEntity != EntityRef) return;

            restoreMaterialTime = Time.time + scoredEffectDuration;
            scoringRenderer.material = scoredMatarial;
            if(audioSource)
                audioSource.Play();
        }
Boundary System
Some objects of the scene (balls, rackets) can be thrown out of the player's reach.
In order to return these objects to their initial position when they are too far away, the BoundarySystem checks whether entities are inside bounds and teleports them accordingly.
To do so, a Boundary QTN file contains the datas required for this feature.
C#
component Bounded
{
    FPVector3 InitialPosition;
    FPQuaternion InitialRotation;
    bool Initialized;
    FPVector3 Extends;
    FPVector3 LimitCenter;
}
In the BoundarySystem, the filter retrieves all entities with the Bounded component
C#
        public struct Filter
        {
            public EntityRef Entity;
            public Bounded* Bounded;
            public Transform3D* Transform;
        }
In the Update(), if the entity start position has not yet been saved (at launch), them the intial position & rotation are saved.
C#
 if(filter.Bounded->Initialized == false)
            {
                filter.Bounded->Initialized = true;
                filter.Bounded->InitialPosition = filter.Transform->Position;
                filter.Bounded->InitialRotation = filter.Transform->Rotation;
            }
Then, for each frame, the system checks if the entity is out of the bounds defined.
In this case, in addition to reinitialized the object position & rotation, it is also required to reset the velocity of the physics body.
C#
   if (IsOutOfBounds(filter.Transform->Position, filter.Bounded->LimitCenter, extends))
            {
                if(f.Unsafe.TryGetPointer<PhysicsBody3D>(filter.Entity,out var physicsBody3D))
                {
                    physicsBody3D->Velocity = FPVector3.Zero;
                    physicsBody3D->AngularVelocity = FPVector3.Zero;
                }
                filter.Transform->Teleport(f, filter.Bounded->InitialPosition, filter.Bounded->InitialRotation);
            }
Of course, to activate this functionality on an object, the component must be added in the entity's "Entity Components" list.
If no extends is defined in the component, a default extends of 12 meters is set.
Also, although this is not shown in the scene, thanks to the LimitCenter variable it is possible to define a specific center for the bounds.
For basketball, for example, it would be possible to define the center of the bound at the shooting position, and reset the ball's position as soon as it is a few meters from the shooting position to avoid fetching the ball after every shot.
Punching Ball
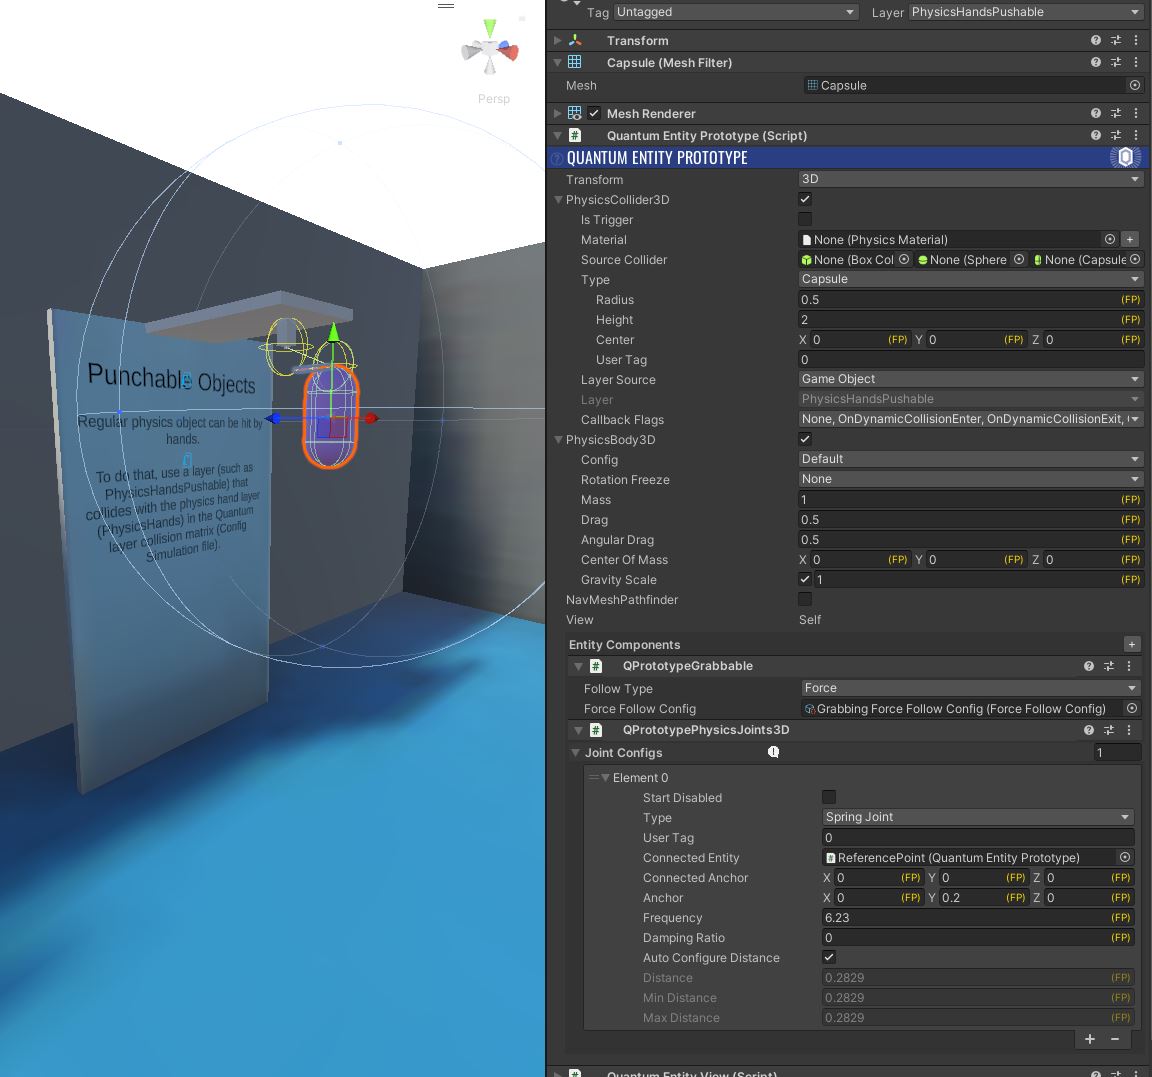
The punching ball game is quite easy to develop with Quantum.
This consists of adding a spring joint to an object that can be punch with the hand.
So, as explain in the Physics Hands chapter, the ball must be configured with the PhysicsHandsPushable layer.
A PhysicsJoint3D with a Spring type must be added to the ball Quantum entity. The connected entity is en entity located on the game support.
The rope visual is managed by the very simple RopeAnchor component : it draw a line renderer between the top of the ball and the other side of the rope (the entity located on the game support).
Plinko
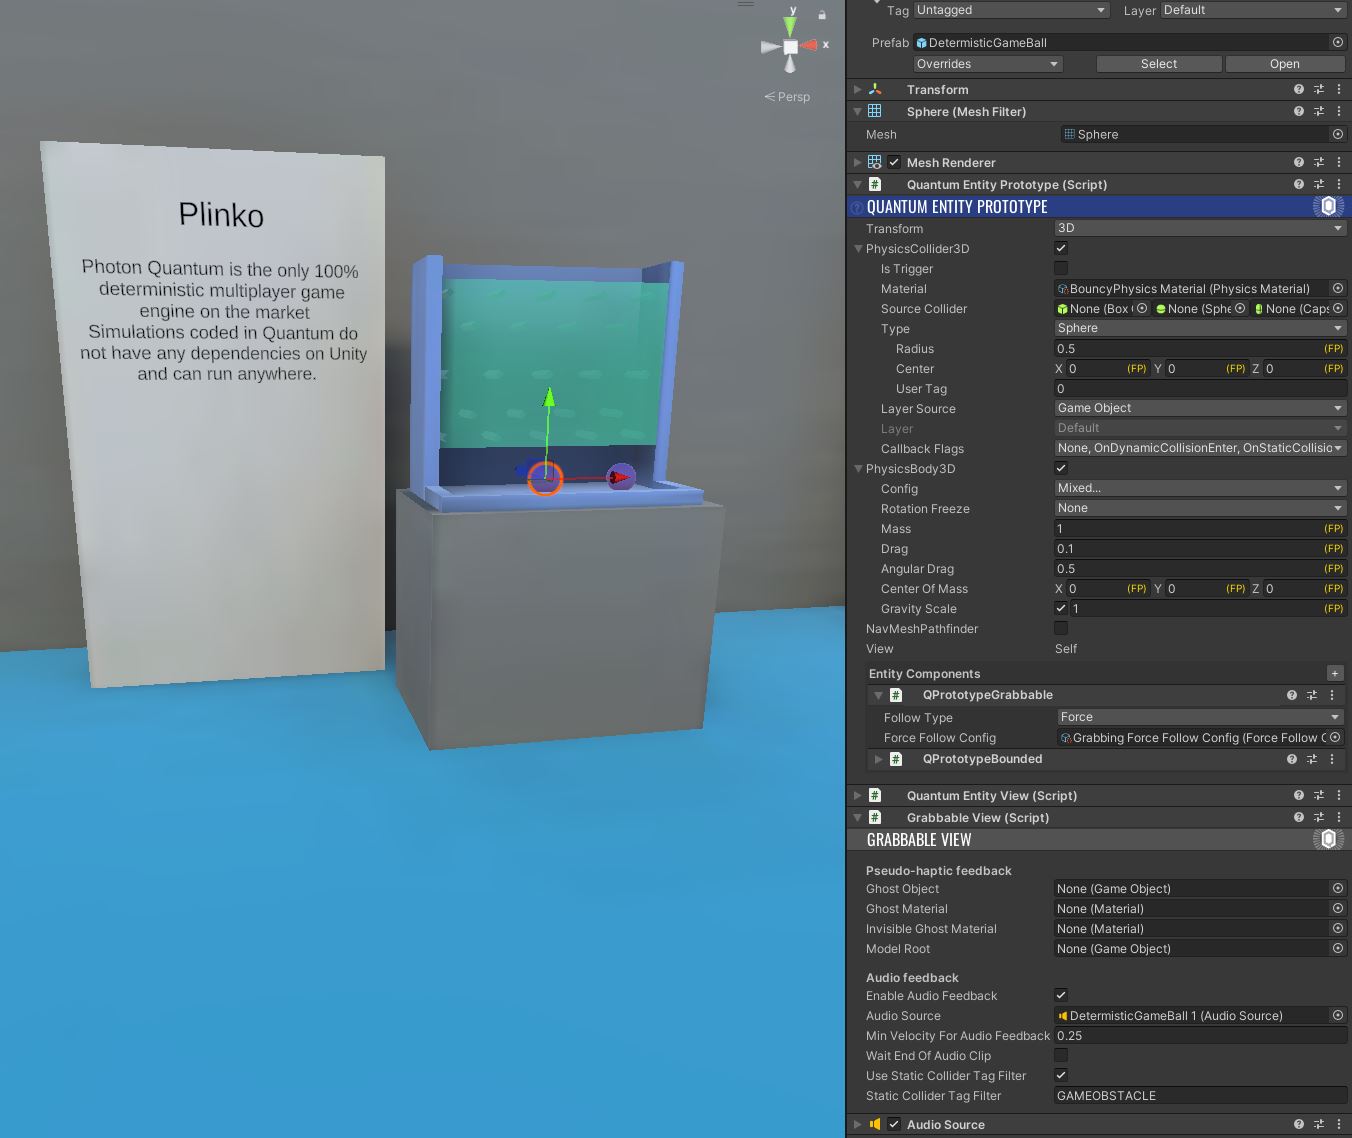
For this game, the only thing that has been developed is to get an audio feedback only when the ball hits one of the obstacles.
To achieve this, an OnCollisionDetectedWithStaticCollider event is defined in the qrabbing QTN file.
C#
event OnCollisionDetectedWithStaticCollider {
    EntityRef GrabbableEntity;
    EntityRef CollidedEntity;
    String CollidedEntityName;
    LayerMask CollidedEntityLayer;
    String CollidedEntityTag;
    nothashed FP Velocity;
}
This event includes the collided entity tag and is called by the GrabbableSystem on the OnCollisionEnter3D callback if the grabbable object collides with a static entity.
C#
public void OnCollisionEnter3D(Frame f, CollisionInfo3D info)
        {
            var grabbableEntity = info.Entity;
            var infoStatic = info.IsStatic;

            if (f.Unsafe.TryGetPointer<Grabbable>(grabbableEntity, out var grabbable))
            {
                if (f.Unsafe.TryGetPointer<PhysicsBody3D>(grabbableEntity, out var grabbablePhysicsBody3D))
                {
                    if (infoStatic)
                    {
                        var collidedEntity = info.Other;
                        var collisionStaticData = info.StaticData;
                        var collidedEntityName = collisionStaticData.Name;
                        var collidedEntityLayer = collisionStaticData.Layer;
                        var collidedEntityTag = collisionStaticData.Tag;
                        f.Events.OnCollisionDetectedWithStaticCollider(grabbableEntity, collidedEntity, collidedEntityName, collidedEntityLayer, collidedEntityTag, grabbablePhysicsBody3D->Velocity.Magnitude);
                    }
                    else
                    {
                        f.Events.OnCollisionDetectedWithDynamicCollider(grabbableEntity, grabbablePhysicsBody3D->Velocity.Magnitude);
                    }
                }
            }
        }
On the Unity side, the GrabbableView subscribes to this event and play the audio clip only if the collided entity tag match with the tag filter configured.
C#
        private void Awake()
        {
            [...]
            if (enableAudioFeedback)
            {
                if (audioSource == null)
                    audioSource = gameObject.GetComponent<AudioSource>();

                QuantumEvent.Subscribe<EventOnCollisionDetectedWithStaticCollider>(listener: this, handler: CollisionDetectedWithStaticCollider);
                QuantumEvent.Subscribe<EventOnCollisionDetectedWithDynamicCollider>(listener: this, handler: CollisionDetectedWithDynamicCollider);
            }
        }


        private void CollisionDetectedWithStaticCollider(EventOnCollisionDetectedWithStaticCollider callback)
        {
            if (callback.GrabbableEntity == EntityRef)
            {
                if(useStaticColliderTagFilter && staticColliderTagFilter != callback.CollidedEntityTag)
                    return;

                if(callback.Velocity.AsFloat > minVelocityForAudioFeedback)
                    PlayAudioFeeback(Mathf.Clamp01(callback.Velocity.AsFloat / 10f));
            }
        }
Punch Them game
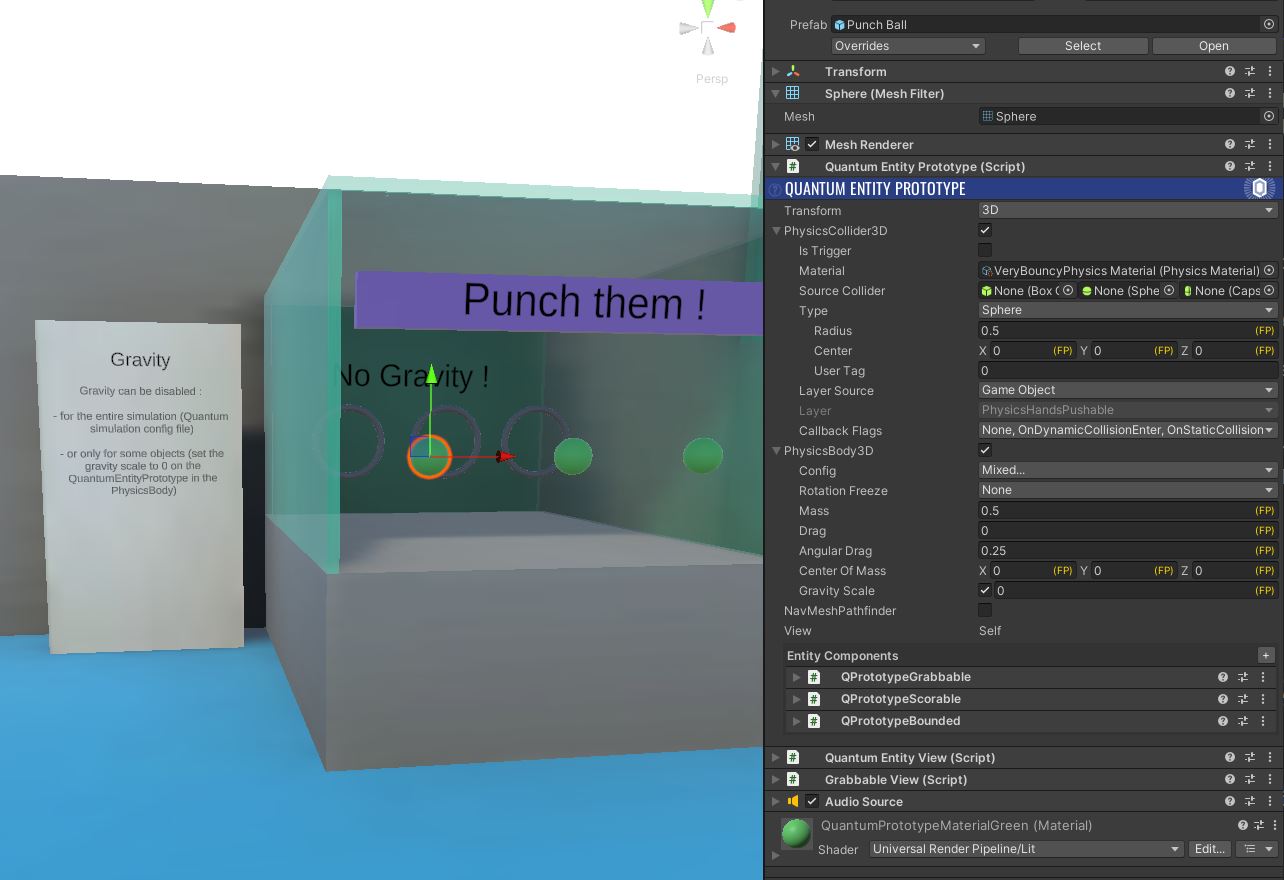
In this game we use scoring gates explained above and have configured the balls with the PhysicsHandsPushable layer so that players can punch them with their hands.
To avoid gravity on the balls, the parameter Gravity Scale of the PhysicsBody3D is set to 0.
Racket game
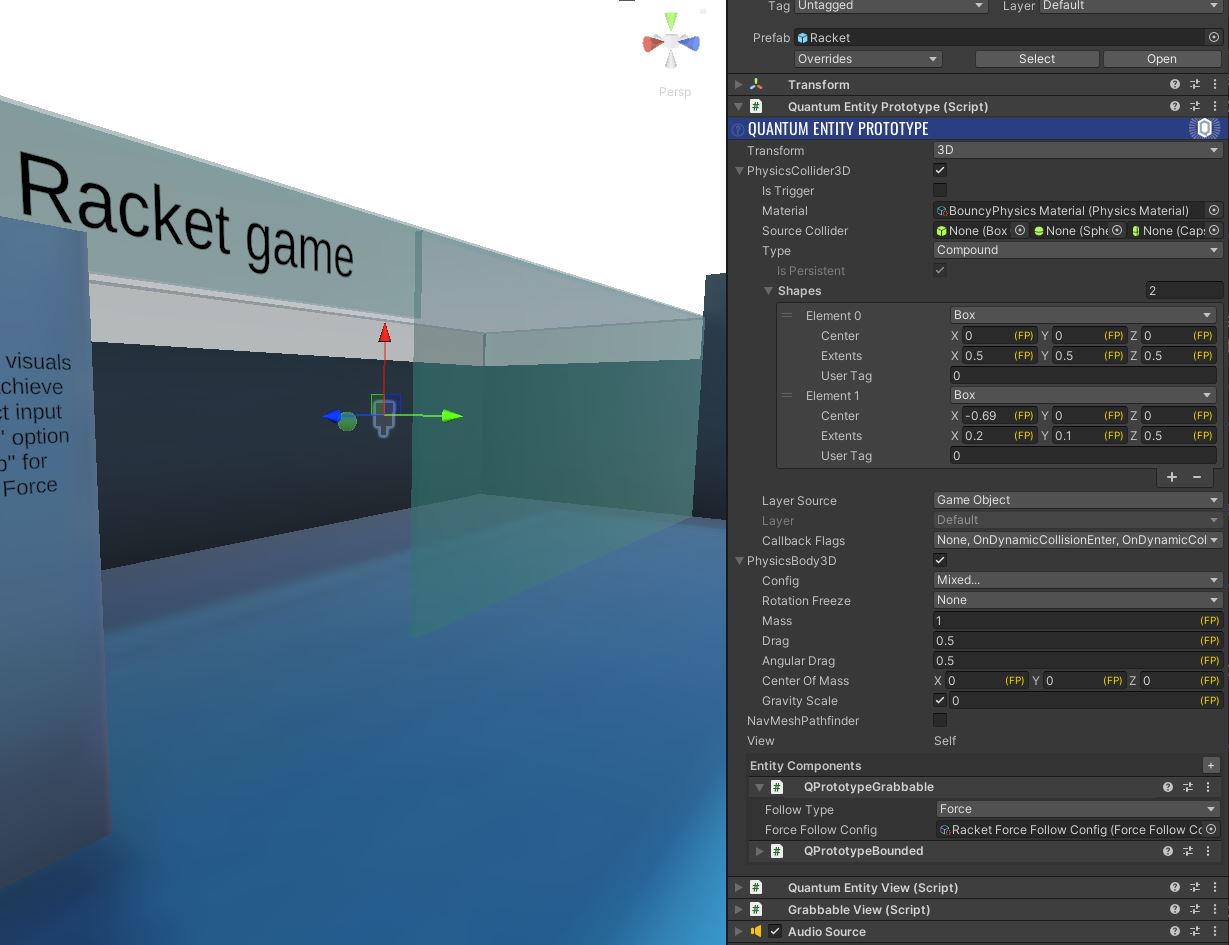
Some gameplays require greater responsiveness, even if this means sacrificing visual smootheness.
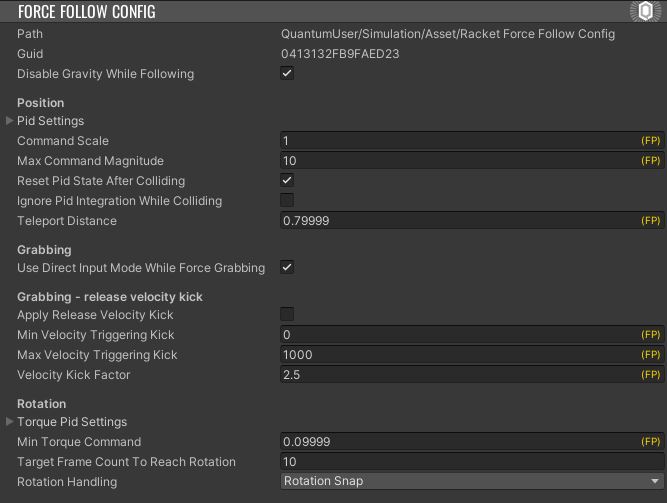
To achieve this, the grabbable component of the racket entity is configured with a specific Force Follow Config file : the "Use Direct input Mode while Force Grabbing" option and select "Rotation Snap" for "Rotation Handling" are enabled.
Basket ball game
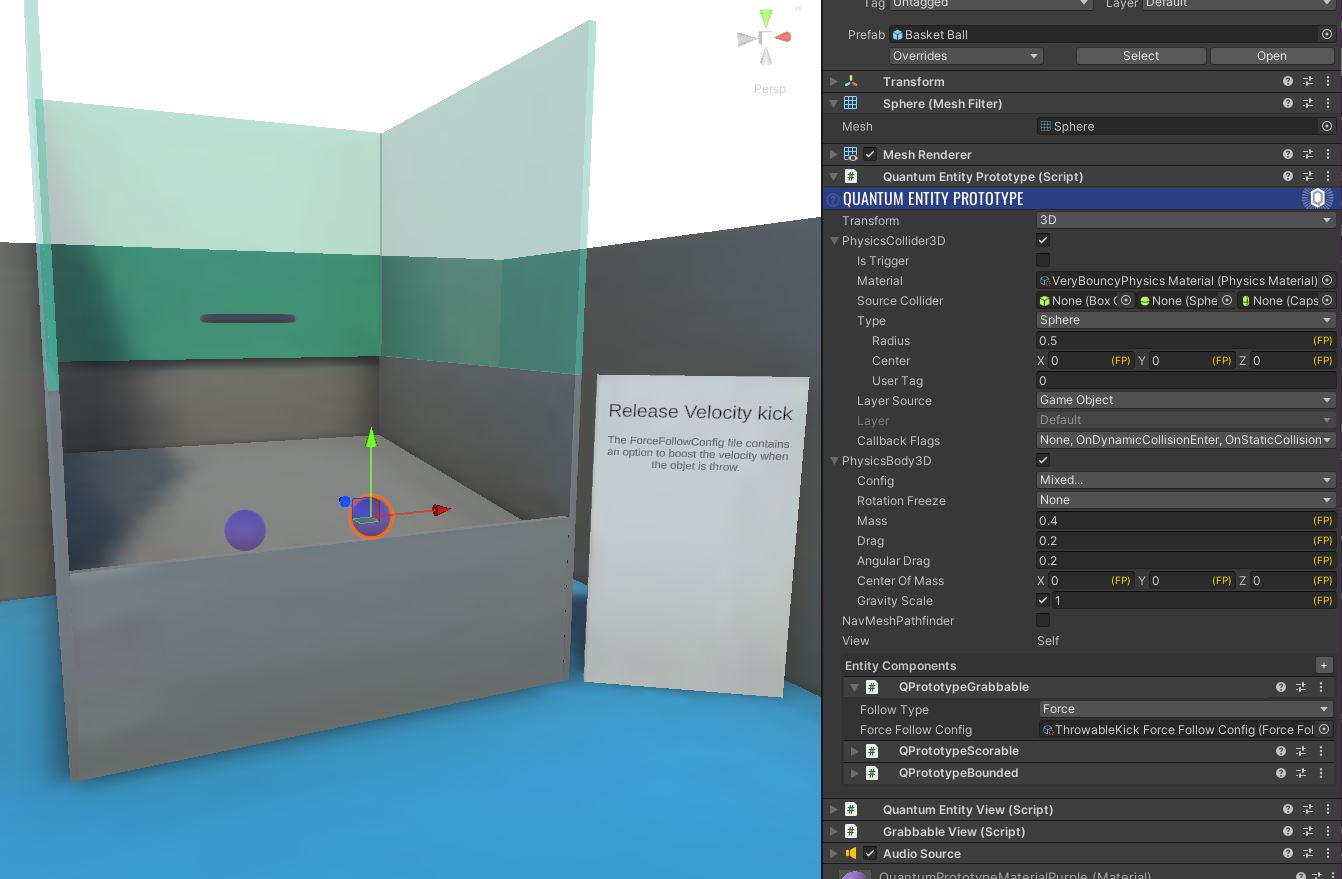
The grabbable component of the ball entity is configured with a specific Force Follow Config file : the "Apply Release Velocity Kick" option is enable in order to boost the velocity when the object is throw.

Third Party Assets
This sample includes third-party free and CC0 assets. The full packages can be acquired for your own projects at their respective site:
- Hands
- Sounds
- https://freesound.org/
- Nathan Gibson (https://nathangibson.myportfolio.com)
- Overview
- Before You start
- Download
- Handling Input
- Global architecture
- Device position synchronization
- Hand smoothing
- Physics grabbing
- Physics hands
- Hand view: position override and pseudo-haptic feedback
- Teleportation
- Tractor beams
- Non-physics grabbing
- Prediction culling
- ConnectionManager
- Core systems details
- HandMoveSystem and HeadMoveSystem
- GrabberSystem and GrabbableSystem
- PhysicsHandsSystem
- RayAndLocomotionSystem
- Gameplays specific elements
- Scoring Gates System
- Boundary System
- Punching Ball
- Plinko
- Punch Them game
- Racket game
- Basket ball game
- Third Party Assets